ACCESSORY-MU Handcrafted Jewelry, Crafts & Graphic Design
  • Home
  • Graphic Design
  • Blog
  • Published Work
  • GIF
  • Downloads
  • Terms of Use
  • About
  • Privacy Policy
  • Home
  • Graphic Design
  • Blog
  • Published Work
  • GIF
  • Downloads
  • Terms of Use
  • About
  • Privacy Policy

BLOG


DIY Boho-Style Wooden Button Bracelets - Tutorial video for Colorful and Beautiful Handmade Bracelets

3/3/2023

0 Comments

 
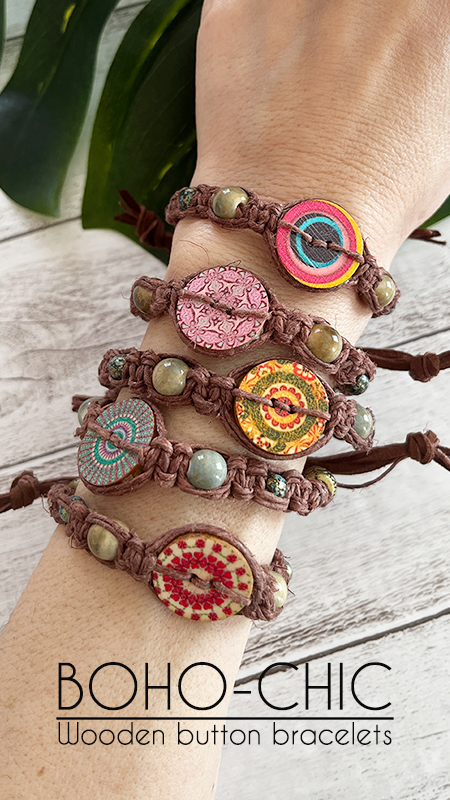
As an Amazon Associate I earn from qualifying purchases. Please read my Amazon Associates Program for more info.
Get ready to create your own stylish DIY boho-style wooden button bracelets! These colorful and beautiful handmade bracelet ideas are perfect for adding a touch of bohemian flair to any outfit. And if you want to take it a step further, check out another tutorial video on making matching wooden button earrings in the same boho style. Follow the link below to learn how to create these fun and vibrant accessories!

​"How to Make Wooden Button Earrings - Boho style colorful & fun earrings"
​
https://youtu.be/paevyzMcz6I

Tools & materials for DIY Boho chic colorful button bracelets
Tools & Materials
​
• Earth ceramic round beads  (8mm) by Bead Landing
™
• CCB (Copper coated plastic) - Assorted CCB Round Beads by Bead Landing™
• Metal round (6mm)
• Wood ring (12mm)

• Faux suede cord (2.6mm x 1.5mm): 
https://amzn.to/3Ye0Hsj 
• Fabric glue:
​ 
https://amzn.to/3Qir3r8 
• Natural polished hemp cord 20L; Brown: Cousin DIY Polished Thin Hemp 20 lb Cord Jewelry String, 300 ft, Brown
• Round nose plier (Optional)
• Scissors
• Toothpicks
• Wood glue: 

https://amzn.to/43GmDNO ​
• Wooden buttons 20mm Circle 2 holes: 
https://amzn.to/44IPaUj
Materials for DIY Boho chic colorful button bracelets
Large hole beads
Select beads with LARGE HOLES to easily thread cords like hemp cord and faux suede. Ensure the holes accommodate both cords for a secure bracelet. If the bead hole is not sufficiently large, you may want to consider using a 10LB HEMP CORD instead. ​


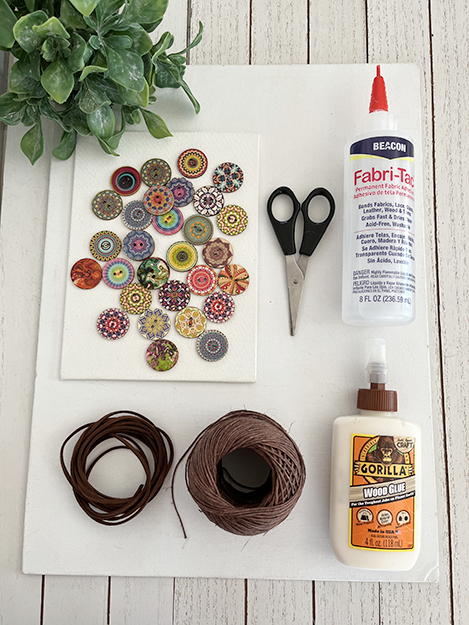
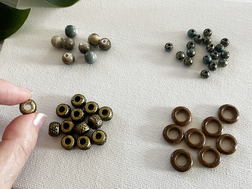
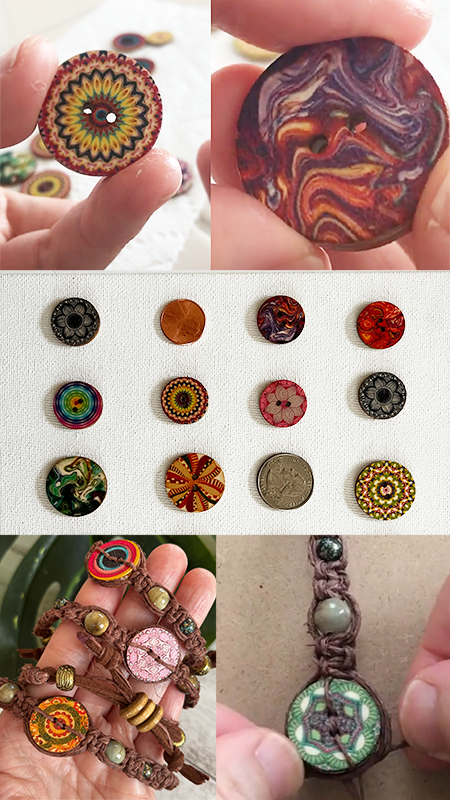
Creating Boho Wooden Button Bracelets
Instructions for Boho Wooden Button Bracelets
​Instructions:
  1. Cut natural hemp cord into six strands: four strands measuring approx.18 inches and two strands measuring approx. 14 inches. Leave approx. 2.5-3 inches and tie a knot at the top of each cord. Separate the cords into three sections: two strands of 18-inch-long cords to the left, two strands of 14-inch cords to the middle, and two strands of 18-inch cords to the right.
  2. Make two macrame square knots, alternating between the left and right sections (left, right, left, right). See the macrame square knot instruction below. Thread a 6mm green metal bead through the two middle cords to the top.
  3. Repeat Step 3. Thread a ceramic bead through the middle cords to the top, and repeat Step 3. The top half of the bracelet is now complete.
  4. Take a 20mm reversible two-hole wooden button (See the reversible wooden button instruction below) and grab the two middle cords, holding them separately. Weave the cords back and forth through the two holes in the wooden button.
  5. Repeat Steps 2-3 to create the bottom half of the bracelet. This time, begin with a ceramic bead and follow with a green metal bead.
  6. Secure the cord end: Take 4 strands and create a loop. 
  7. Hold the loop and use the remaining two strands to wrap around the loop, then tie a knot to secure. Repeat the process for the other end.
  8. Use fabric glue to secure the loop ends.
  9. Apply wood glue to both sides of the button, and press the left and right cords onto the button. Hold in place until dry.
  10. Cut one piece of hemp cord and one piece of faux suede cord to approx.8.5 inches. Cut another set.
  11. Thread a hemp cord and faux suede cord through one of the bracelet loop ends, and fold them in half. Hold all four cord ends together and thread a CCB antique brass bead with a large hole through all four cords. Pull the bead down towards the loop end to secure the cords. Repeat this process for the other bracelet loop end.
  12. Thread three wooden rings through one of the cord ends, and thread the other cord ends through the wooden rings from the opposite side. Tie a knot at each end.

Macrame Square Knot
Instructions for Macrame Square Knot
Instructions:
  1. Tie a knot at the top of the three cords and secure them to a clipboard.
  2. Take the left cord and place it over the middle cord,  making a "4" shape.
  3. Place the right cord over the left cord.
  4. Pass it under the middle and over the left cord.
  5. Pull the cords tightly to create the first half of the square knot.
  6. Take the right cord and place it over the middle cord, making a backwards "4" shape.
  7. Place the left cord over the right cord.
  8. Pass it under the middle and over the right cord.
  9. Pull the cords tightly to complete the square knot.

Repeat these steps, starting with step 2, to create as many square knots as desired.

Creating reversible wooden buttons
Step 1: Take a one-sided wooden button, Step 2: Apply wood glue to back, Step 3: Press two buttons together
  1. Take a single-sided wooden button (20mm circle).
  2. Apply a small amount of wood glue to the back of the button using a toothpick.
  3. Take another single-sided button and glue it onto the back of the first button, sandwiching the two buttons together. Press firmly and hold in place until the glue dries completely. You now have a reversible wooden button.

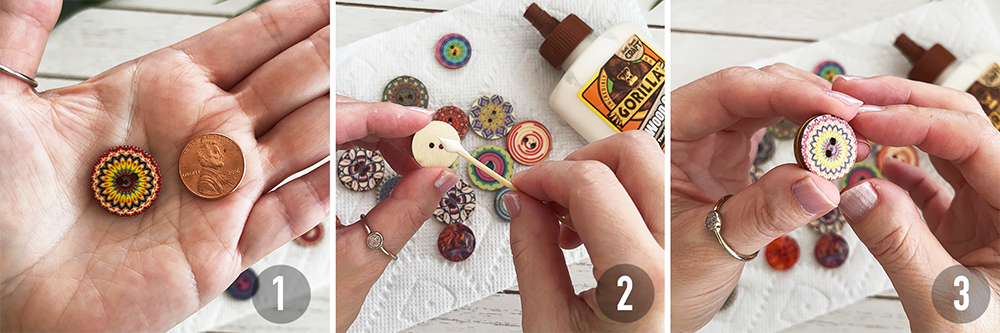
Tip 1 - Preventing hemp cord from fraying
To prevent the hemp cord from fraying when threading through beads multiple times, apply a small amount of wood glue to the cord end.​
Step 1: Dip hemp cord end in wood glue, Step 2: Remove excess glue with paper towel, Step 3: Allow glue to dry
  1. Dip the end of the hemp cord into the wood glue and remove any excess glue.
  2. Use a paper towel to remove any excess glue if necessary. Allow the wood glue to dry completely before using the cord.
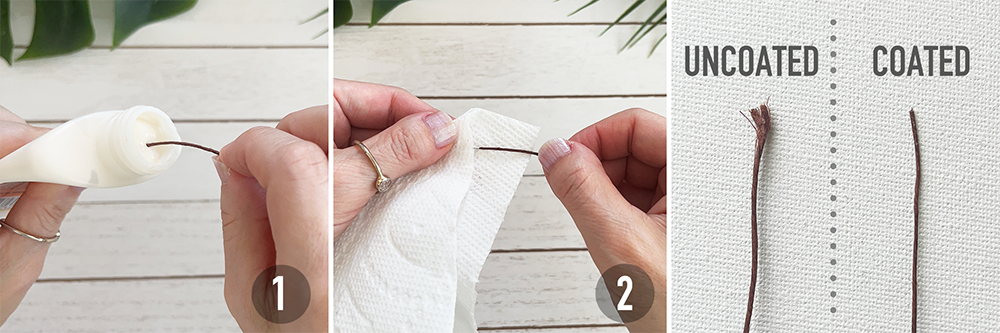
Tip 2 - Applying nail polish to wooden buttons
To protect the surface and colors of wooden buttons, apply a clear nail polish.​
Step 1: Dip brush in clear nail polish, Step 2: Apply thin coat to wooden button, Step 3: Allow to dry
  1. Dip the brush of the clear nail polish into the bottle and remove any excess polish.
  2. Apply a thin, even coat of nail polish to the surface of the wooden button, covering the entire area. For added protection, apply a second or third coat once the previous coat is dry.
  3. Allow the nail polish to dry completely before handling the buttons.
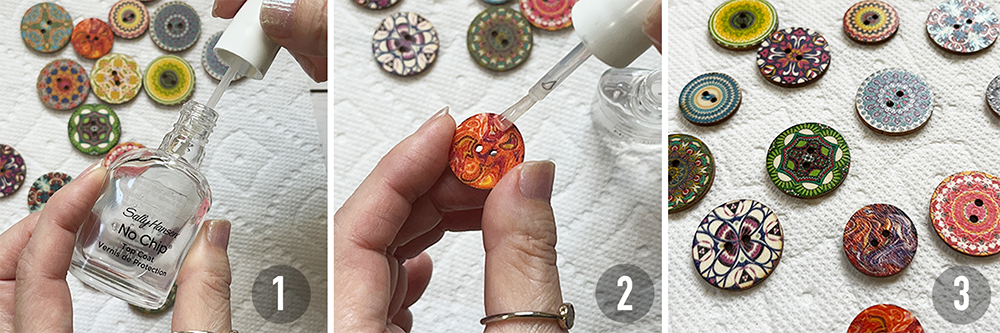
​Please note that any crafts or DIY projects should be attempted with caution.
Picture Colorful Boho-chic wooden reversible bracelets for women
Boho Chic Colorful wooden button bracelets for women
Colorful Boho Chic Wooden Button Button Bracelets for women
0 Comments


Leave a Reply.

    Author


    Picture

    Archives

    January 2025
    November 2024
    November 2023
    October 2023
    September 2023
    August 2023
    July 2023
    June 2023
    May 2023
    April 2023
    March 2023
    December 2022
    April 2022
    December 2021
    November 2021
    October 2021
    March 2020
    January 2020
    October 2019
    July 2019
    March 2019
    July 2015

    Categories

    All
    Jute Crafts
    Sustainable Crafts

    RSS Feed

Proudly powered by Weebly