
|
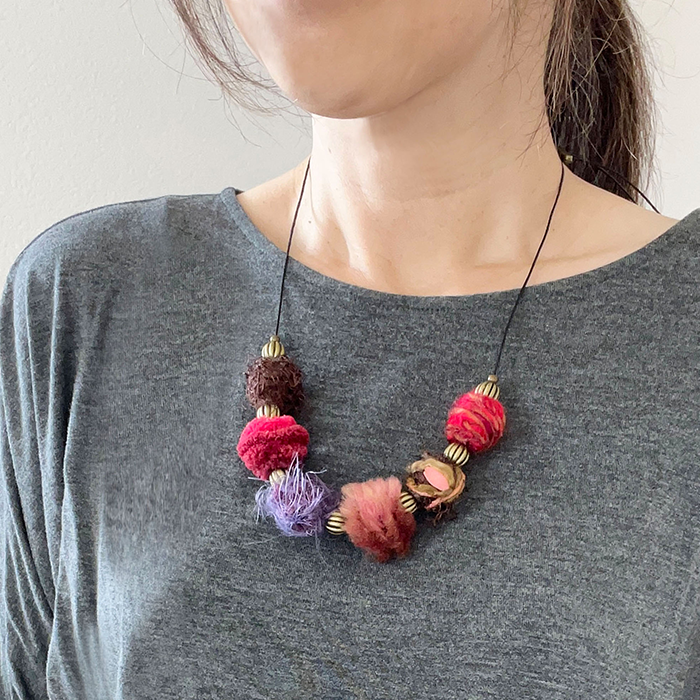
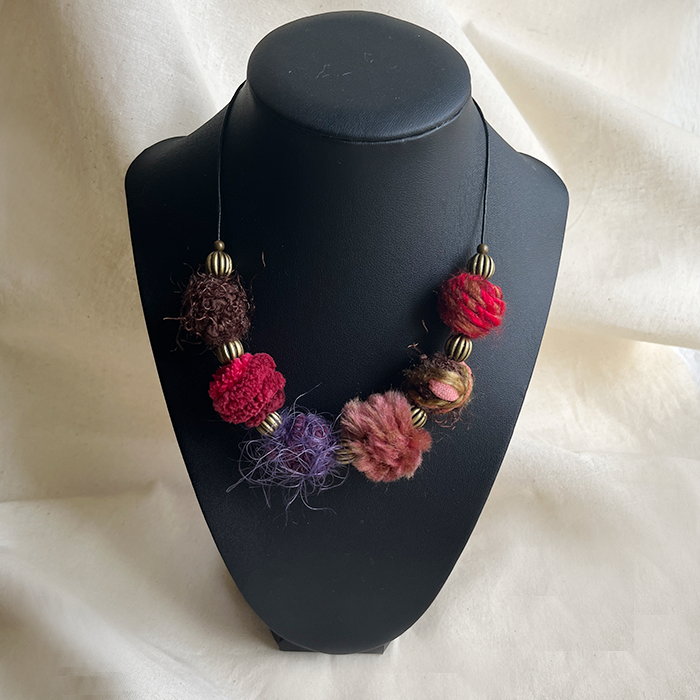
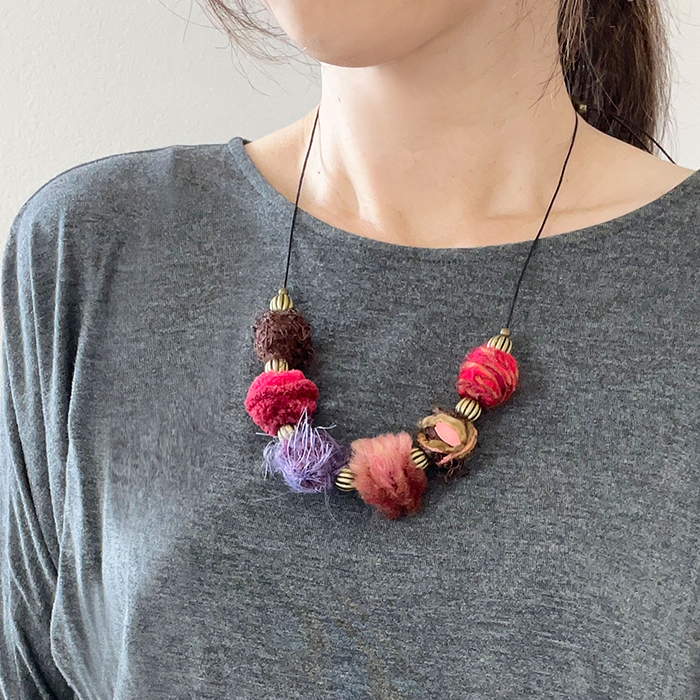
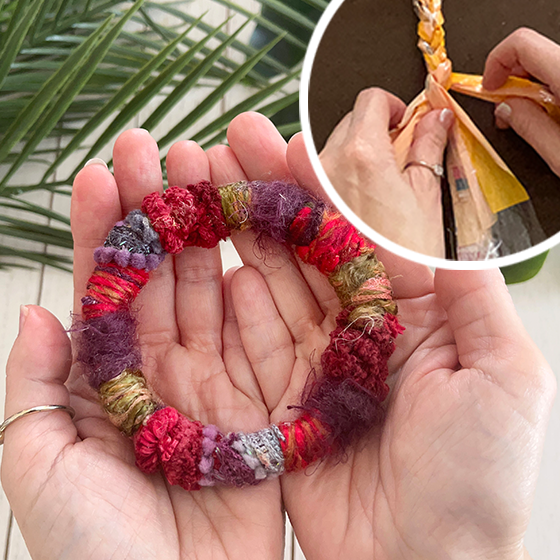
As an Amazon Associate I earn from qualifying purchases. Please read my Amazon Associates Program for more info Dive into the world of DIY creativity with this guide on crafting a cozy and unique necklace adorned with shades of red yarn-wrapped beads. This simple yet elegant project combines the warmth of red hues with the durability of 1 mm waxed cotton cord, resulting in a unique accessory that reflects your personal touch. Join me on this crafting journey and discover the joy of handmade beauty.  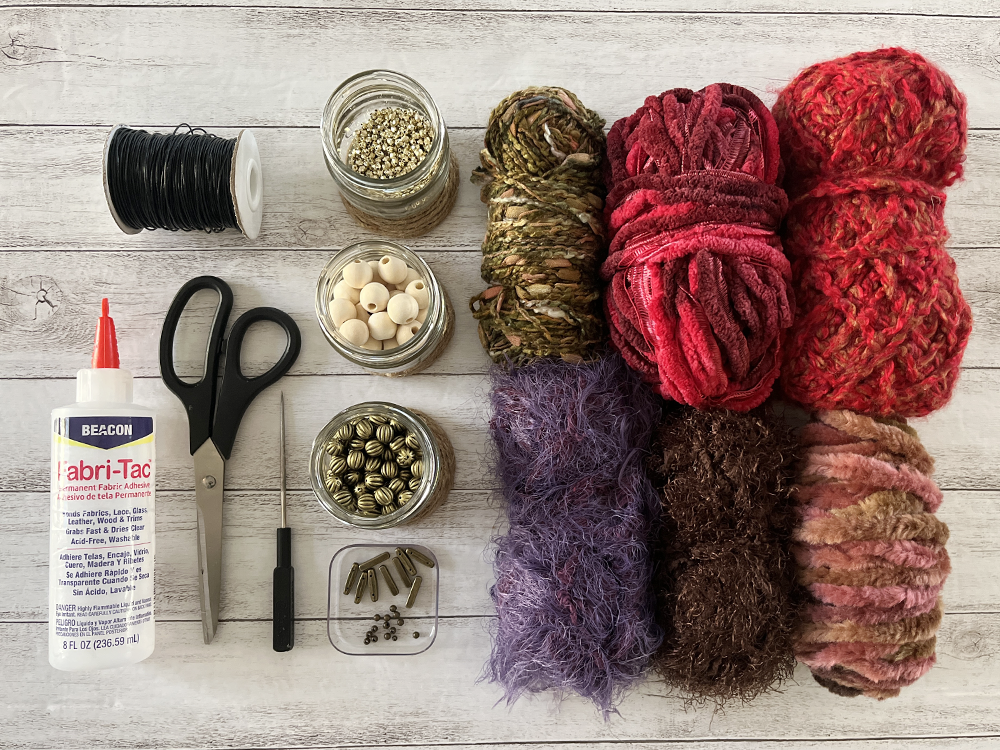 Supplies:
Creating Yarn Ball Beads 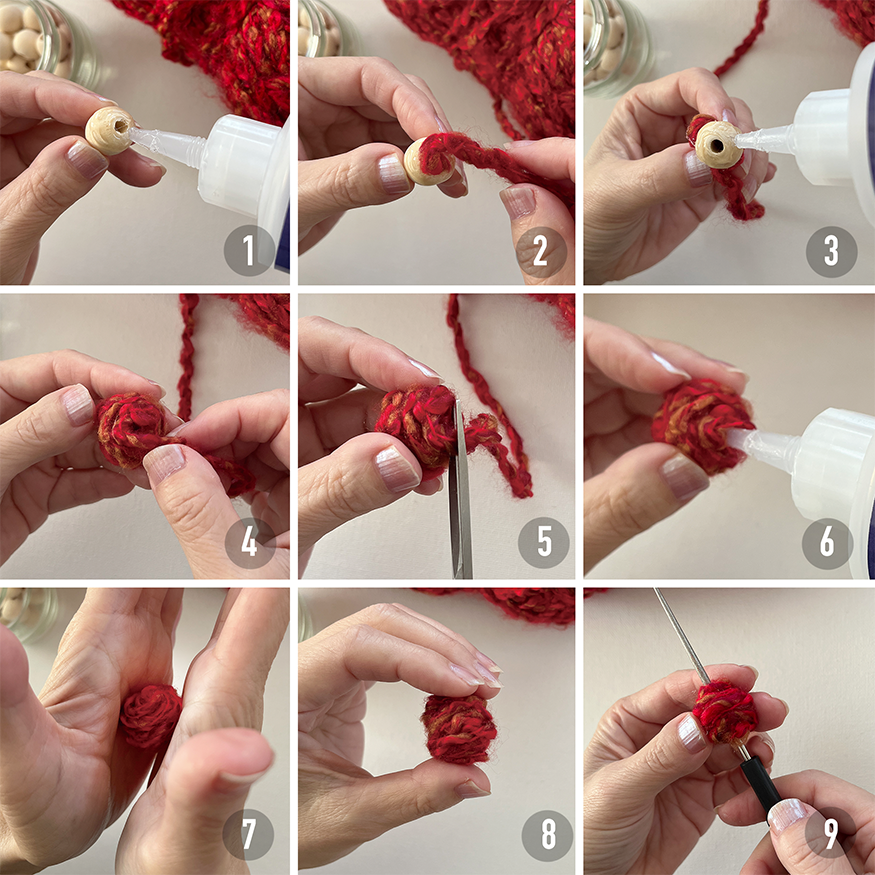 Instructions:
Experimenting with Colors and Textures 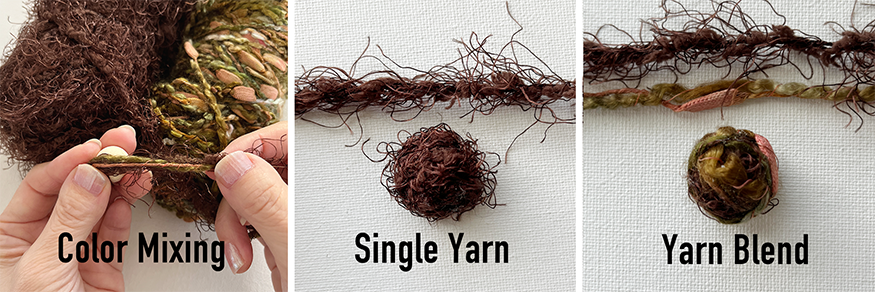 You can explore blending two different colors and/or textures to craft unique and personalized beads. Diversify your collection by crafting additional beads using various colors and textures of yarn. For this project, aim to create six yarn beads to fashion a complete and vibrant necklace. Assembling Adjustable Cord Necklace  Instructions:
Alternative methods to finish cord ends There are alternative methods to finish cord ends. While this project utilizes an adjustable cord closure with a 2-hole spacer bar bead, you have the flexibility to use crimp cord end caps or tie knots for a cord loop closure. Crimp Cord End Closure  Crimp Cord End Closure: Secure cord ends with bead crimps for a polished finish. Slide a bead crimp onto each cord end. Use pliers to flatten the crimps, securing the cords in place. Trim any excess cord. Loop Closure 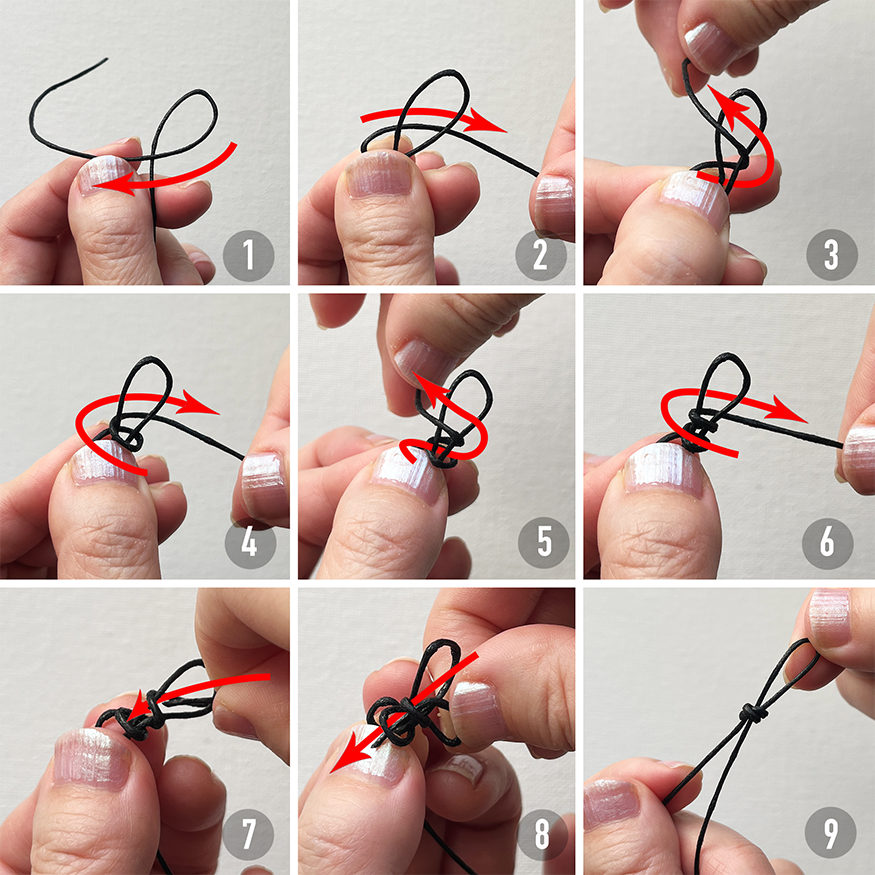 Loop Closure: Create a loop at the cord end. Wrap the shorter cord around the base twice. Thread it through the two loops from top to bottom. Pull tight to secure, ensuring a snug knot. 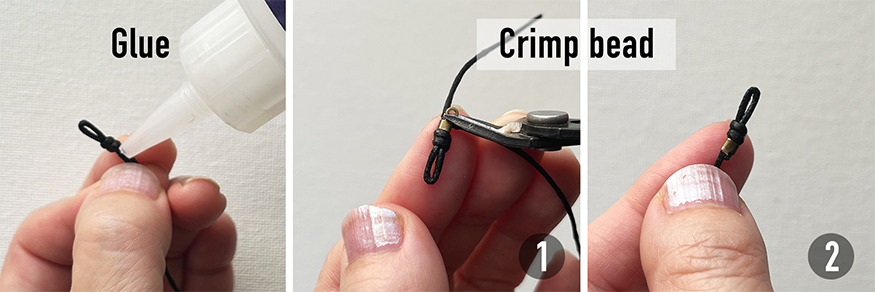 Glue: Trim any excess cord and use jewelry glue to reinforce and secure the loop ends. Crimp beads: Alternatively, you can opt for crimp beads to provide additional stability, securing them just below the knot for a polished finish. Please note that any crafts or DIY projects should be attempted with caution.
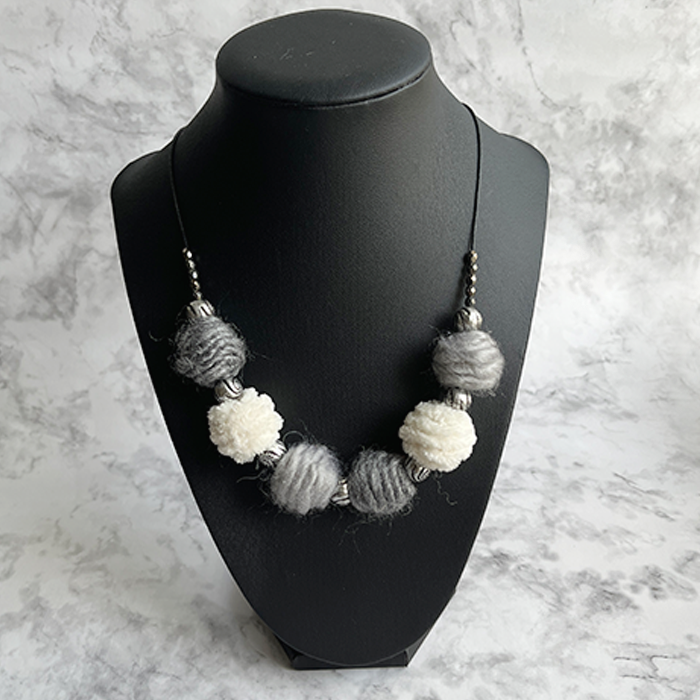
Explore necklaces & earrings with the same style as yarn-wrapped bead necklace, but with different colors and textures for a unique look.
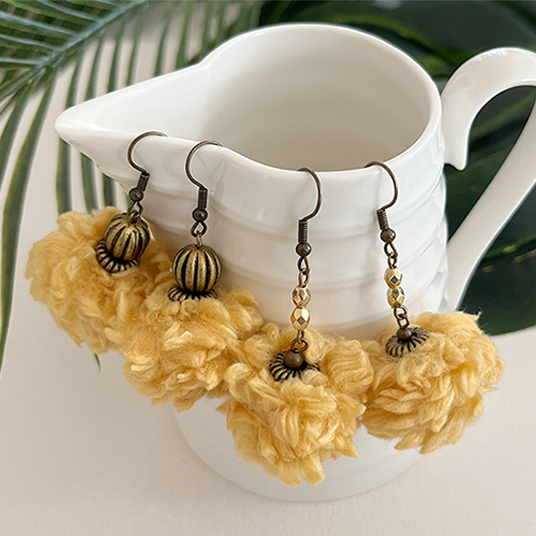
Same Style Necklace: DIY Adjustable Statement Necklace with Yarn-Wrapped Ball Beads Same Style Earrings: DIY Earrings Tutorial - Yarn-Wrapped Magic: Creating Unique Wooden Bead Earrings Same Style Necklace: DIY Adjustable Navy Cord-Wrapped Large Ball Bead Statement Necklace - Jewelry Making at Home Same style Earrings: Easy DIY Navy Cord-Wrapped Ball Bead Earrings: A Step-by-Step Guide
0 Comments
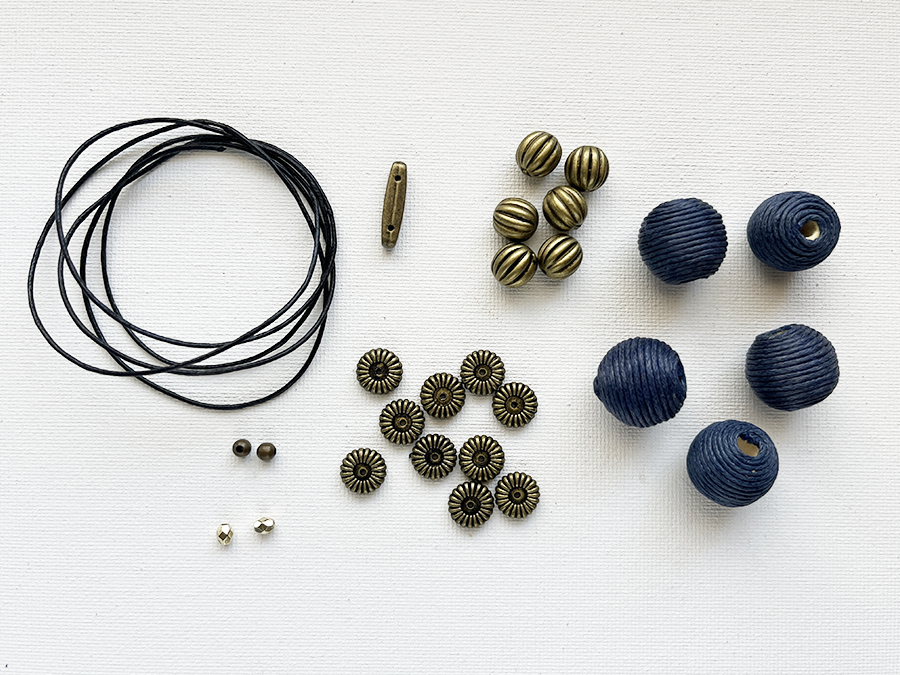
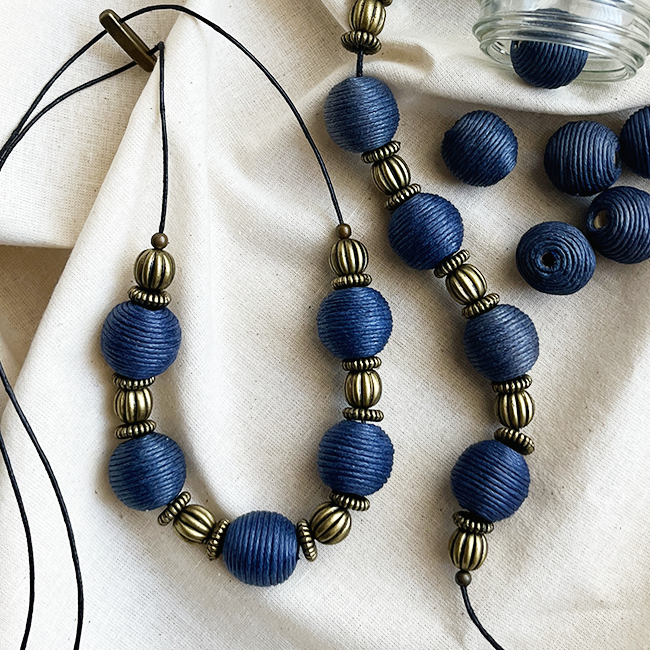
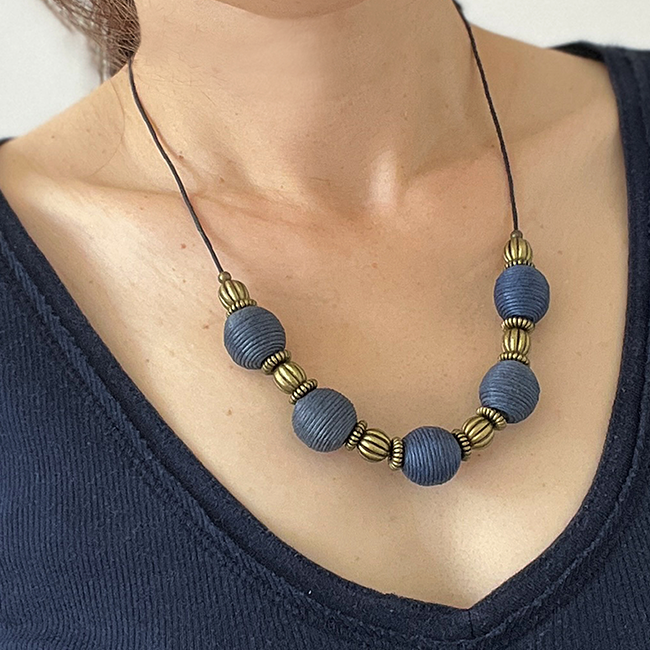
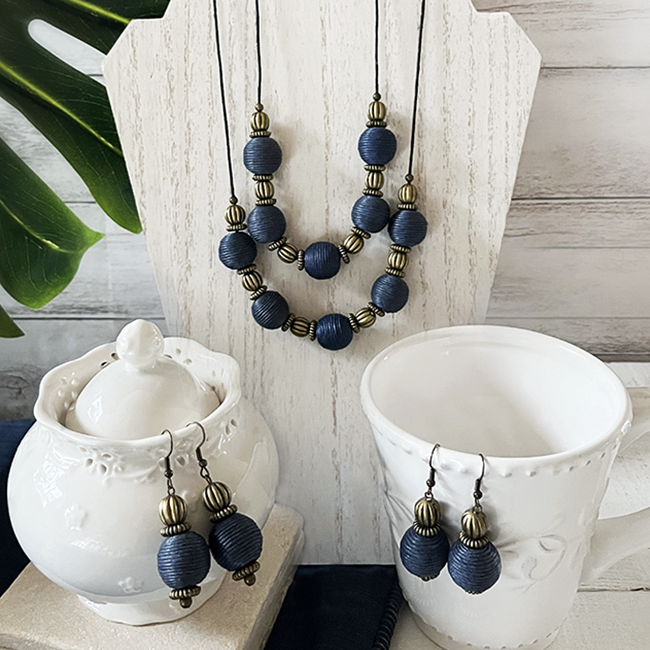
DIY Adjustable Navy Cord-Wrapped Large Ball Bead Statement Necklace - Jewelry Making at Home11/1/2023 As an Amazon Associate I earn from qualifying purchases. Please read my Amazon Associates Program for more info In this blog post, I will walk you through the steps to create your own Navy Cord-Wrapped Large Ball Statement Necklace. Using a 1mm black waxed cotton cord, CCB beads and Navy cord-wrapped large beads, it's a straightforward project to craft a unique accessory that can be worn over a turtleneck sweater or with various outfits. The adjustable cord not only allows for versatility in styling but also ensures a comfortable and customizable fit, making it a practical choice for any occasion. If you're looking to complete your jewelry collection, check out the related posts: Matching Earrings: Easy DIY Navy Cord-Wrapped Ball Bead Earrings: A Step-by-Step Guide Same Style Necklace: DIY Adjustable Statement Necklace with Yarn-Wrapped Ball Beads Same Style Earrings: DIY Earrings Tutorial - Yarn-Wrapped Magic: Creating Unique Wooden Bead Earrings These posts offer additional DIY ideas and tutorials in the same style as the Adjustable Cord-Wrapped Large Ball Statement Necklace. Let's get started on this creative journey!
Creating Navy Cord-Wrapped Bead Adjustable Cord Necklace 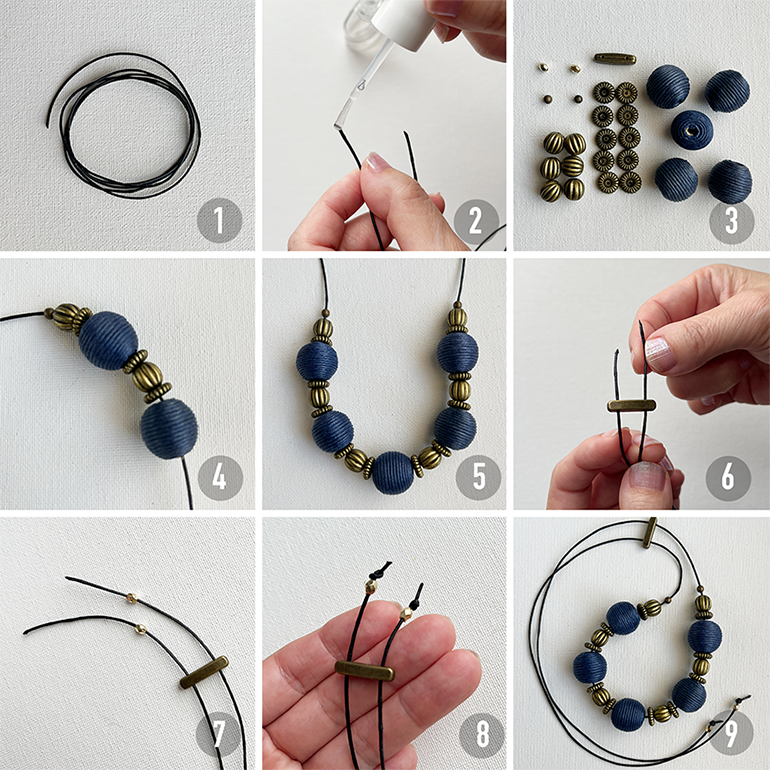 Instructions:
Preventing Cord Fraying (Optional)  Instructions:
Please note that any crafts or DIY projects should be attempted with caution.
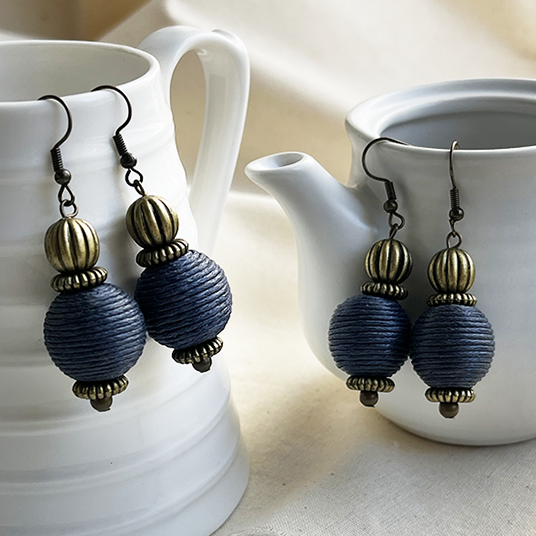
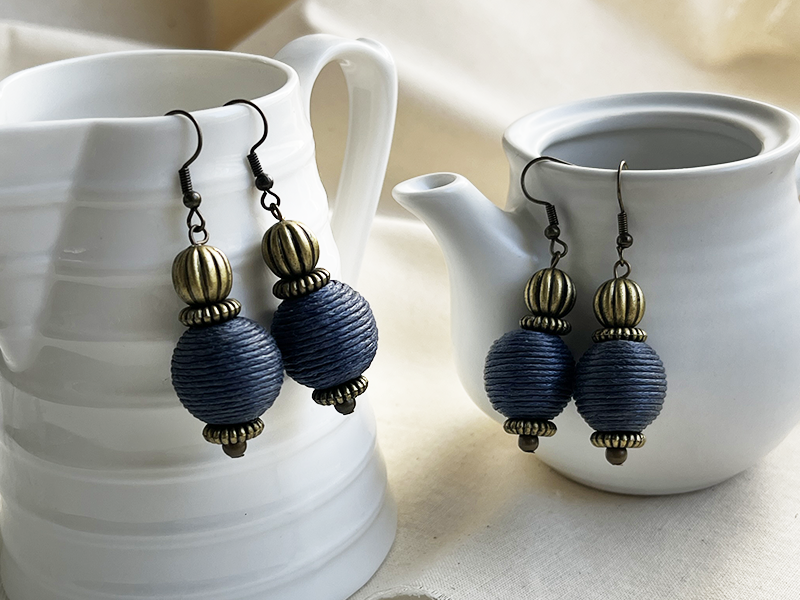
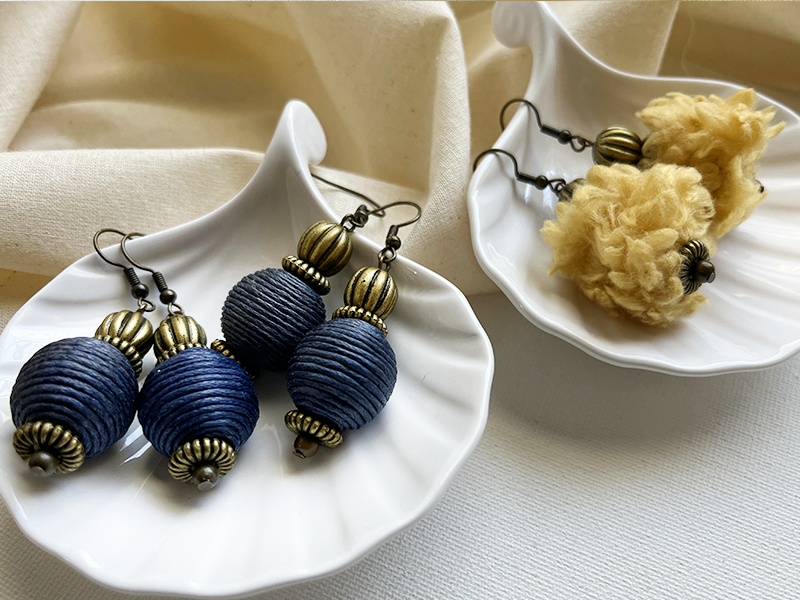
As an Amazon Associate I earn from qualifying purchases. Please read my Amazon Associates Program for more info Are you looking for a fun and easy jewelry project? Why not explore the world of crafting by making your very own oversized round bead statement earrings? These earrings not only offer a touch of individuality and elegance but also serve as wonderful, personalized gifts. Whether you're going for a laid-back look or gearing up for a special event, these earrings can complement any outfit. In this guide, I used navy cord-wrapped large beads, but you can also create your unique yarn-wrapped large beads using the method outlined in my previous post, "DIY Earrings Tutorial - Yarn-Wrapped Magic: Creating Unique Wooden Bead Earrings." With a little time and a dash of patience, you'll be crafting an elegant and unique pair of earrings. I hope you find as much joy in making them as I do!
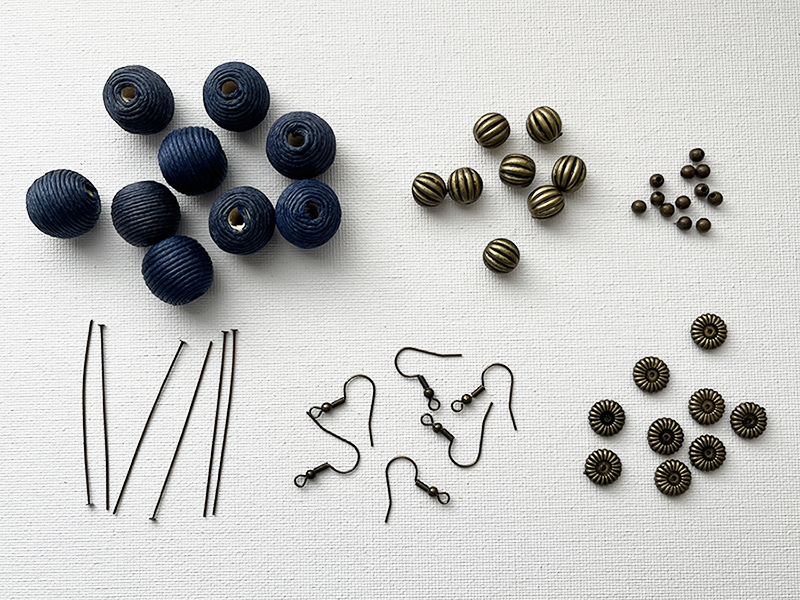
Creating Navy Cord-Wrapped Ball Bead Earrings 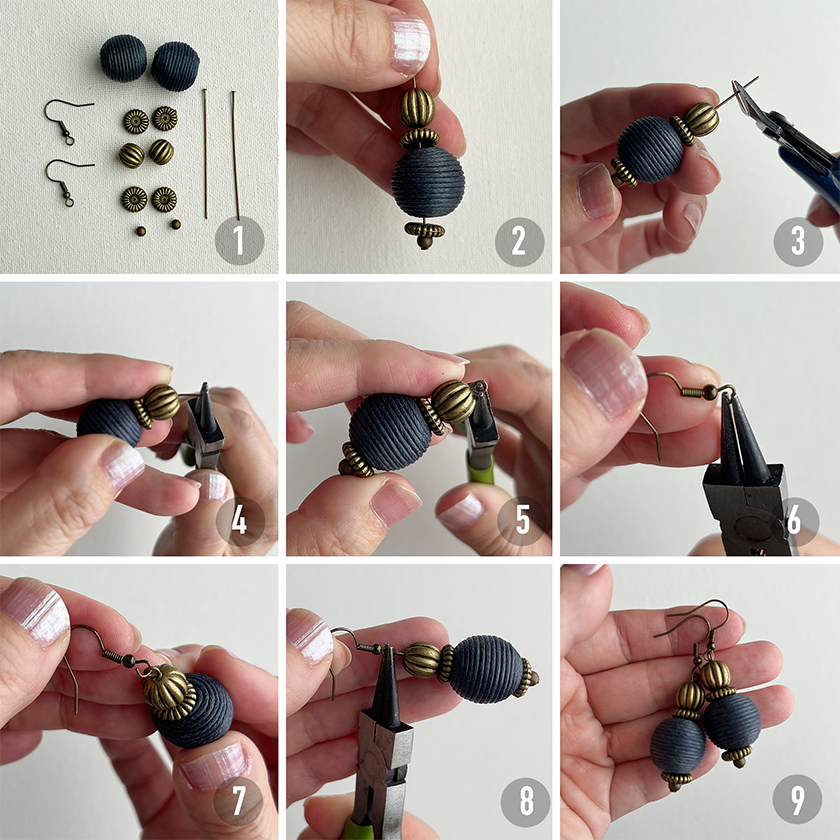 Instructions:
Please note that any crafts or DIY projects should be attempted with caution.
Easy DIY Project - Transform Plastic Bags into Napkin Rings
As an Amazon Associate I earn from qualifying purchases. Please read my Amazon Associates Program for more info.
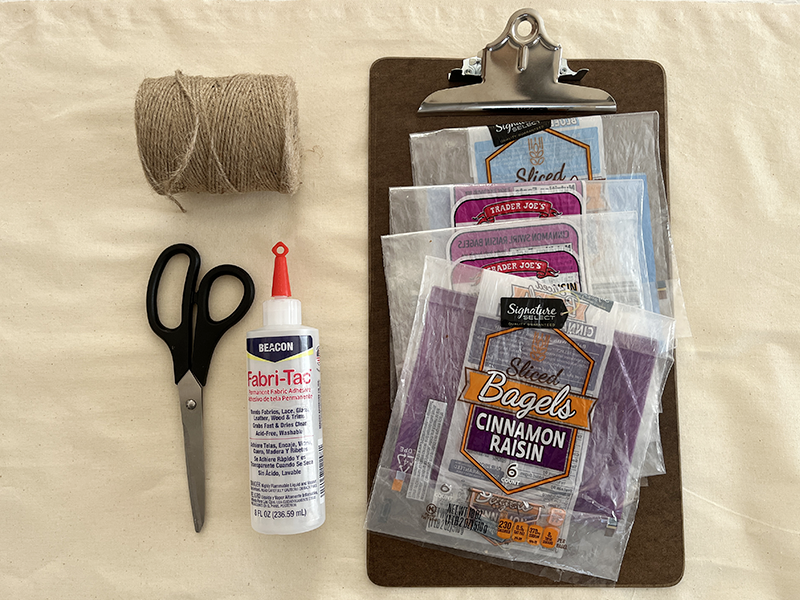
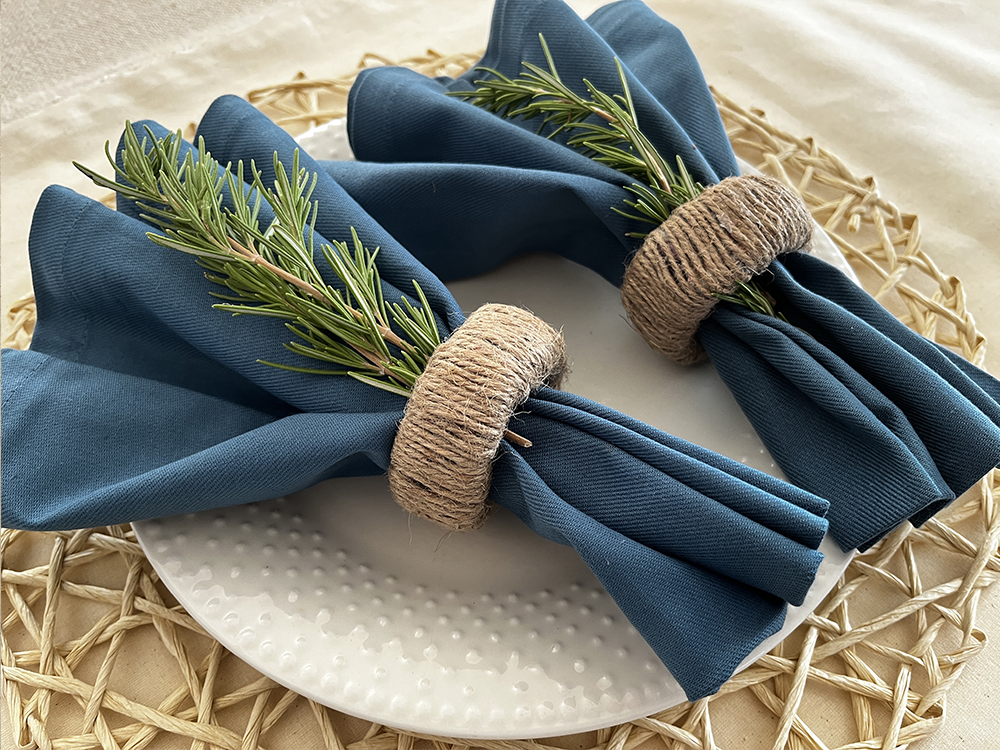
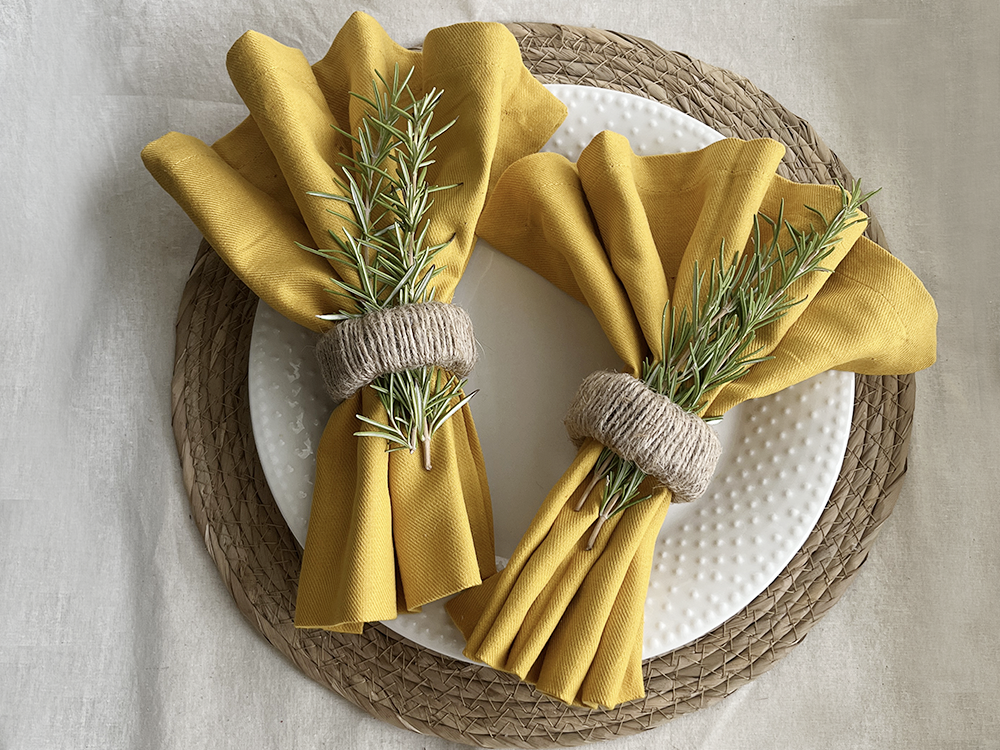
Transform ordinary plastic grocery bags into charming, eco-friendly napkin rings with this DIY tutorial. With a handful of plastic grocery bags and some simple crafting supplies, you can create natural and stylish napkin rings. It's a quick and creative way to add a rustic touch to your dining experience.
Creating a napkin ring using plastic grocery bags
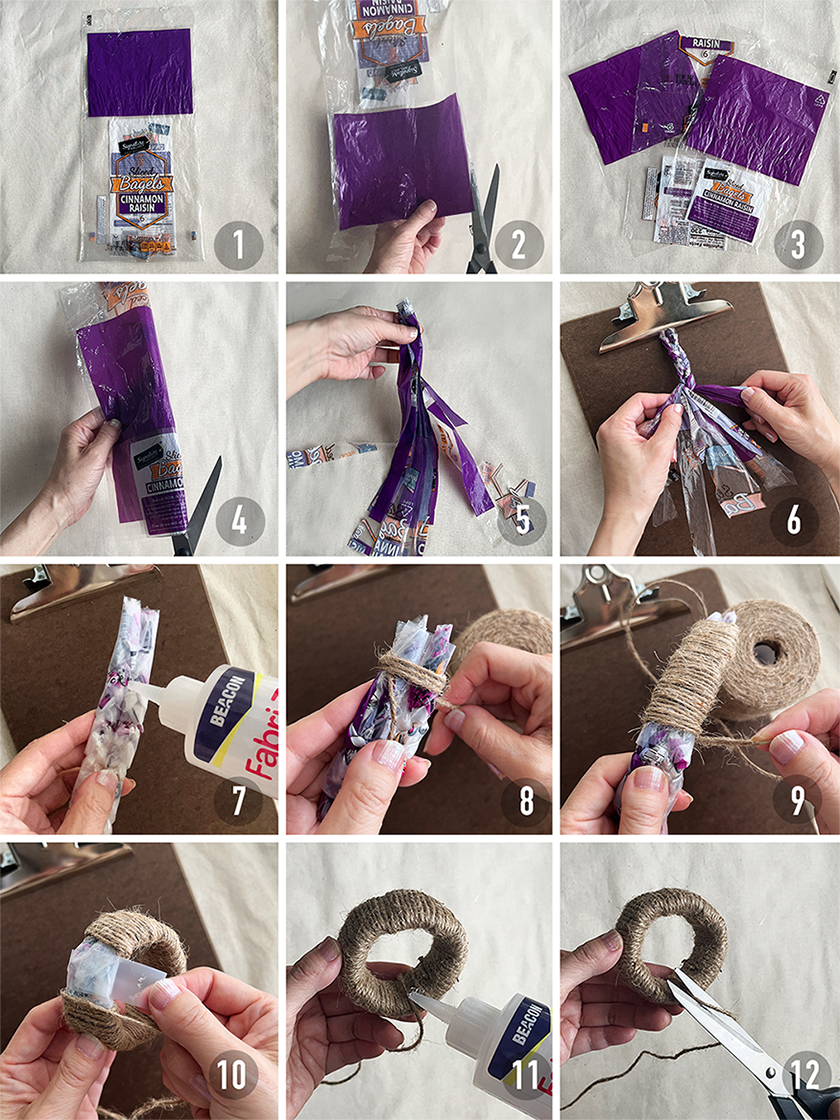
Instructions:
Please note that any crafts or DIY projects should be attempted with caution.
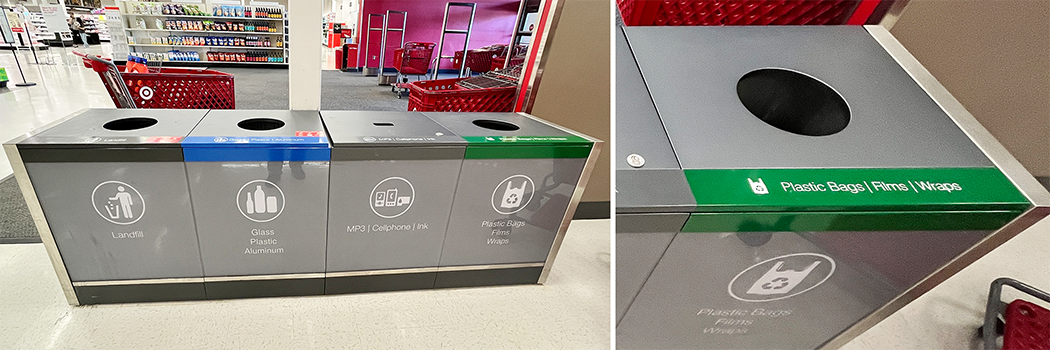
Recycling Plastic Bags at Retail Stores
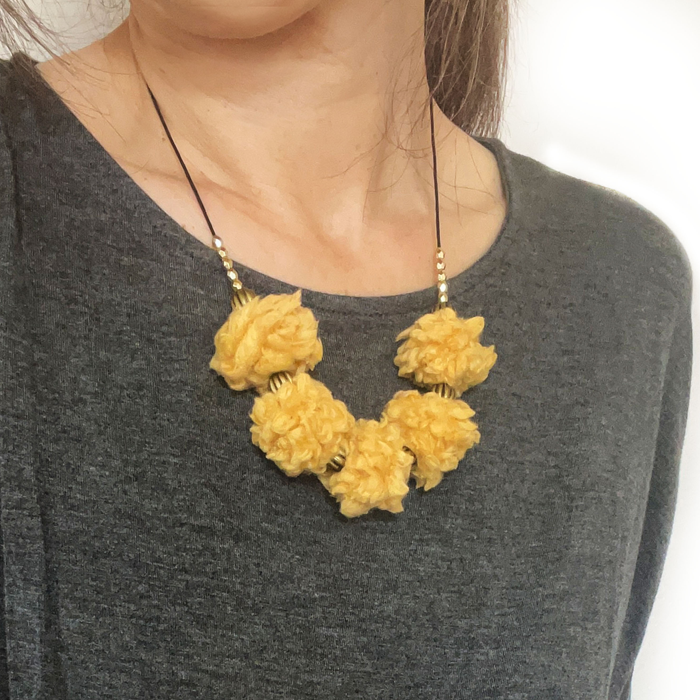
As an Amazon Associate I earn from qualifying purchases. Please read my Amazon Associates Program for more info Step into the realm of DIY jewelry with a creative twist. Today, we're diving into the craft of making your very own necklace, uniquely designed using yarn-wrapped wooden beads. This DIY necklace tutorial unveils the magic of transforming ordinary jewelry-making supplies and everyday materials, such as natural wooden beads, into handcrafted yarn beads. With just a handful of essentials including yarn and fabric glue, you'll unlock the art of crafting necklace that truly reflect your individuality. This tutorial uses yellow faux fur yarn, imparting a cozy and warm appearance. However, the beauty of this craft is its versatility. By choosing different colors or textures like red, blue, or any other variation, you can create a look and feel that's entirely your own. It's a fusion of warmth and elegance, making it ideal for both personal adornment and sharing the joy through handmade gifts. And if you want to take it a step further, check out another tutorial video on making matching yarn-wrapped ball earrings in the same style. Follow the link below to learn how to create these fun and vibrant accessories! "DIY Earrings Tutorial - Yarn-Wrapped Magic: Creating Unique Wooden Bead Earrings" https://youtu.be/6wG_2atVoYo 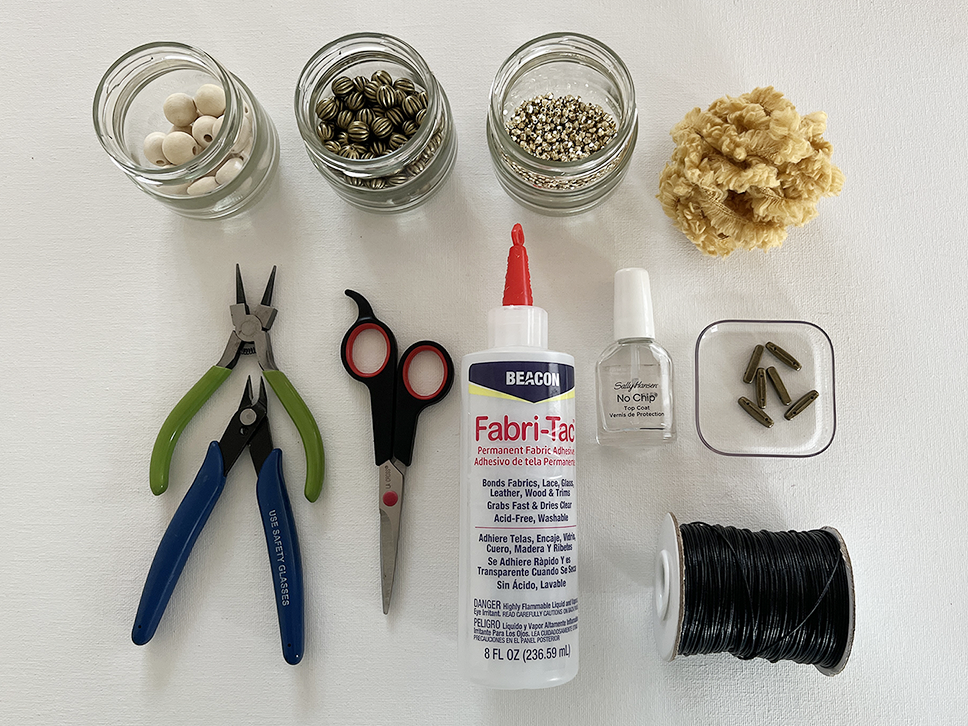 Supplies:
Creating Yarn Ball Beads 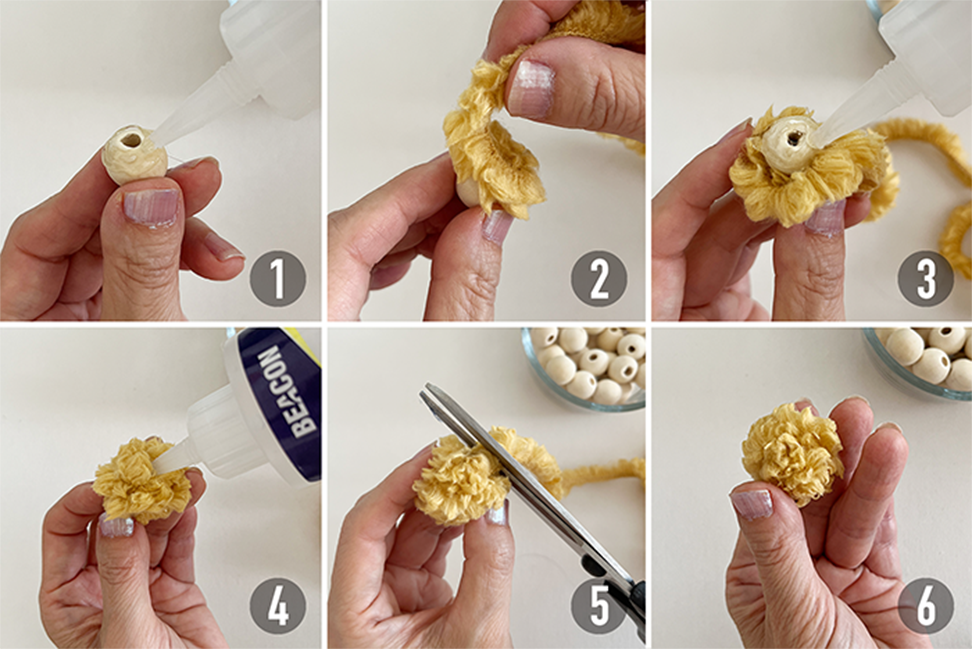 Instructions:
Assembling Adjustable Cord Necklace  Instructions:
Creating Bead Holes Safely If yarn has covered your bead holes, you can use a bead reamer or round-nose pliers to create an opening for the beads. When using a bead reamer or round-nose pliers, exercise caution to avoid injuring yourself. 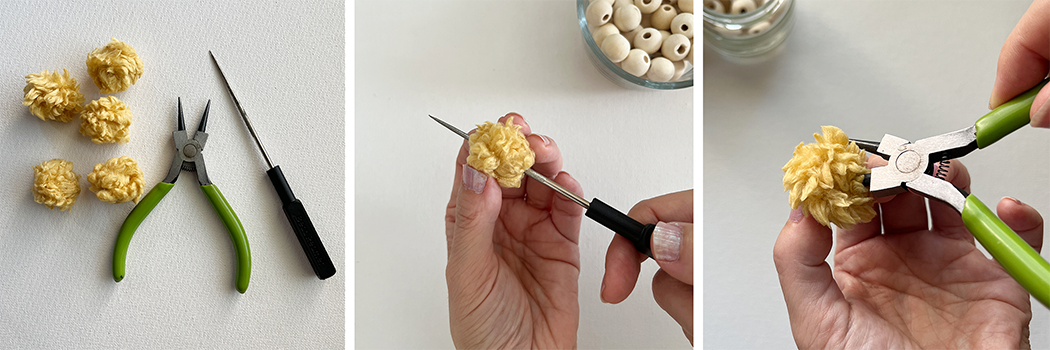 Preventing Cord Fraying (Optional) Instructions:
Please note that any crafts or DIY projects should be attempted with caution. Explore necklaces with the same style as yarn-wrapped bead necklaces, but with different colors and textures for a unique look.
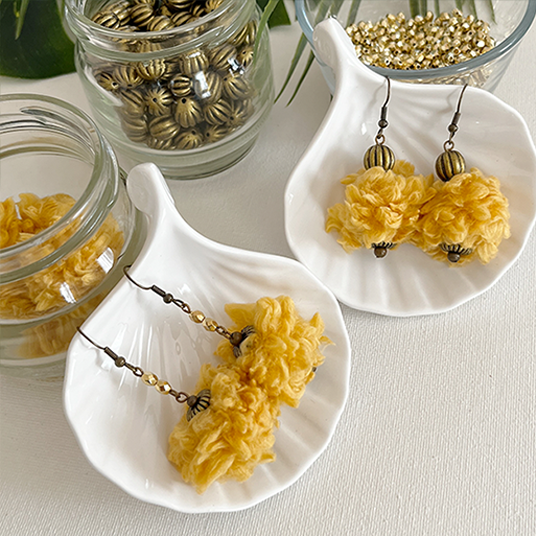
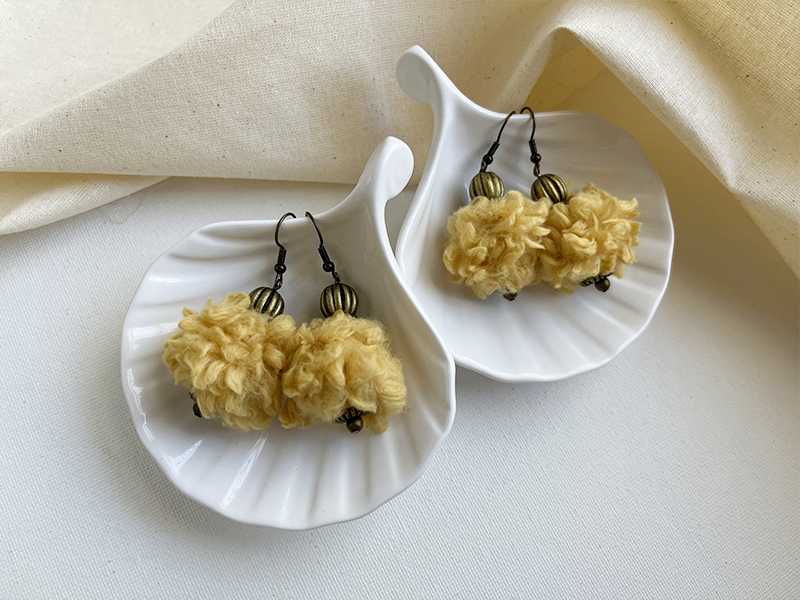
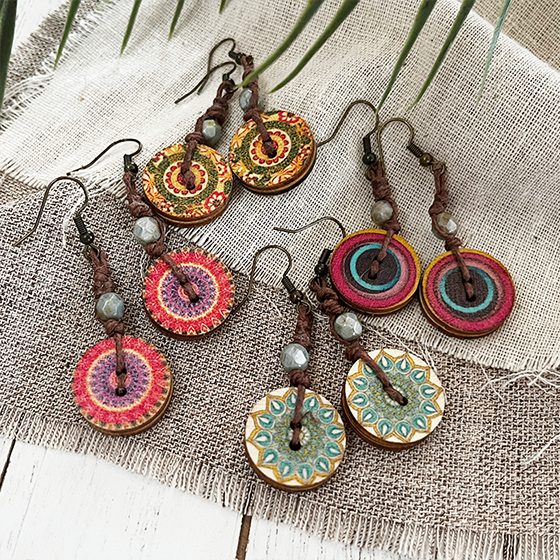
As an Amazon Associate I earn from qualifying purchases. Please read my Amazon Associates Program for more info Welcome to the world of crafting your very own unique earrings using yarn and wooden beads. In this DIY earrings tutorial, you'll learn how to transform basic jewelry making supplies and simple materials, like natural wooden beads, into custom-made yarn beads. With just a few essentials like yarn and fabric glue, you'll have the power to design earrings that are uniquely yours. For this tutorial, the choice is yours when it comes to yarn colors and textures. Feel free to explore different options and experiment with larger wooden beads to give your earrings an even more distinctive touch. So, if you're ready to infuse your personal style into your jewelry collection, join me on this creative journey. Let's dive into crafting elegant, one-of-a-kind earrings that will make a statement wherever you go. 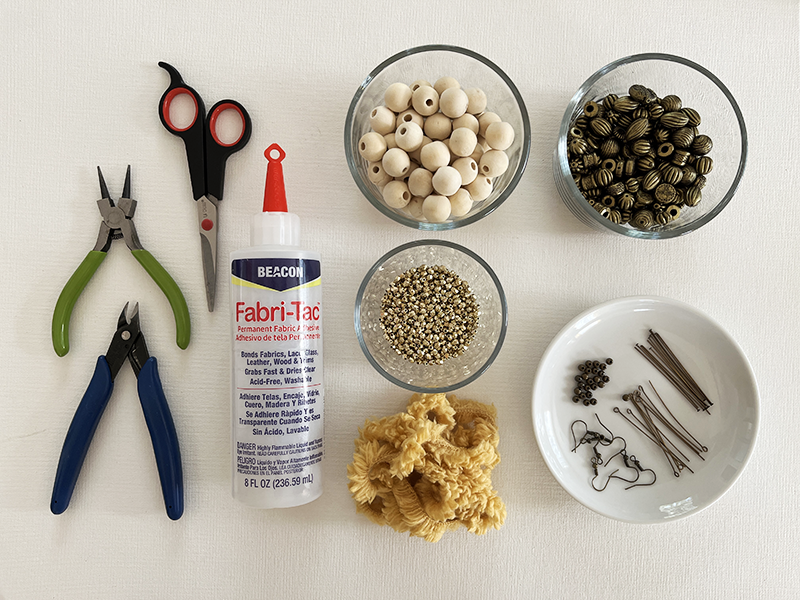 Supplies:
Creating Yarn Ball Beads 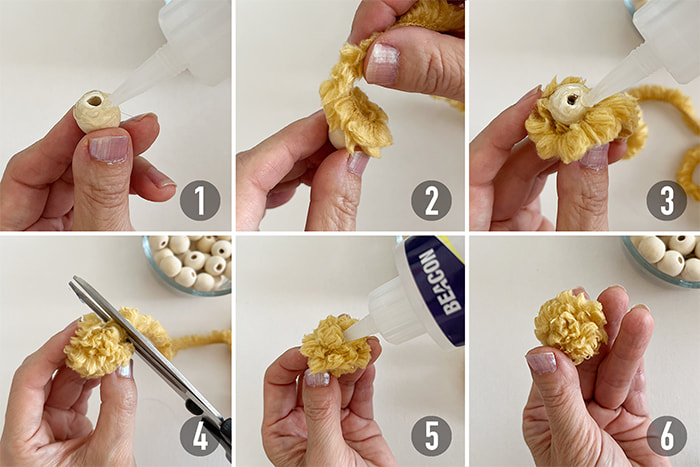 Instructions:
Assembling Earrings using CCB Antique Bass Beads 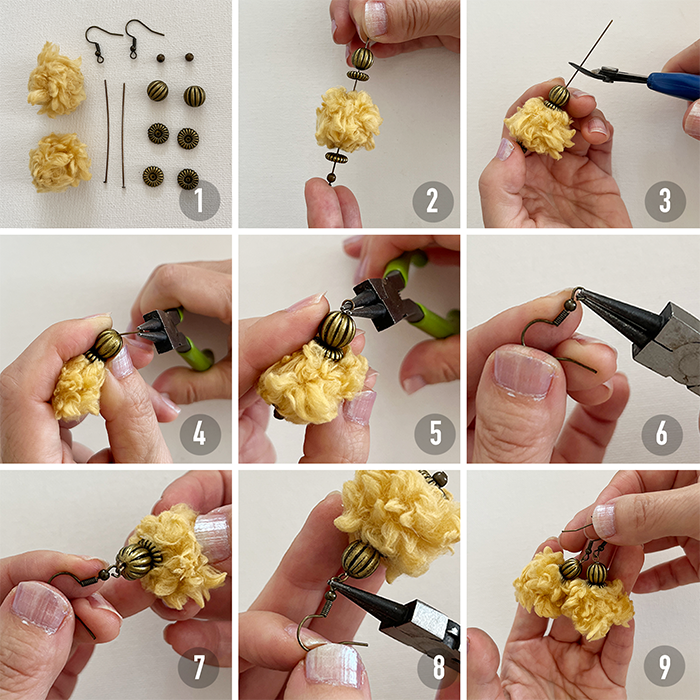 Instructions:
Assembling Earrings using 4-mm Acrylic Metallic Faceted Beads (Gold) 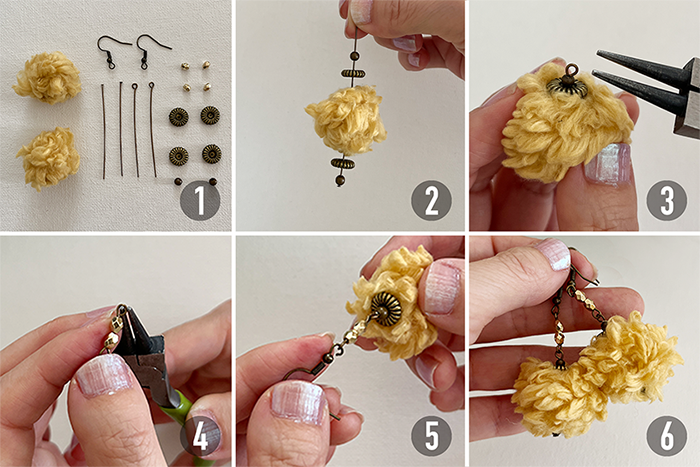 Instructions:
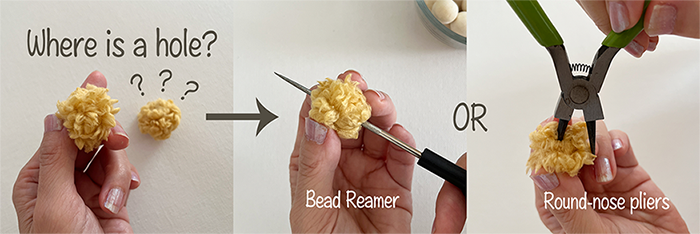 If yarn has covered your bead holes, you can use a bead reamer or round-nose pliers to create an opening for the beads. When using a bead reamer or round-nose pliers, exercise caution to avoid injuring yourself. Please note that any crafts or DIY projects should be attempted with caution.
Explore More Projects
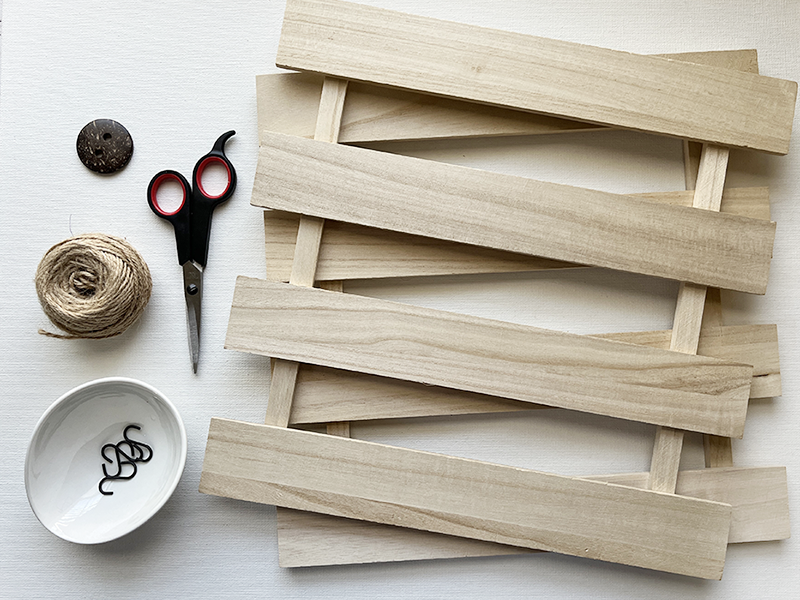
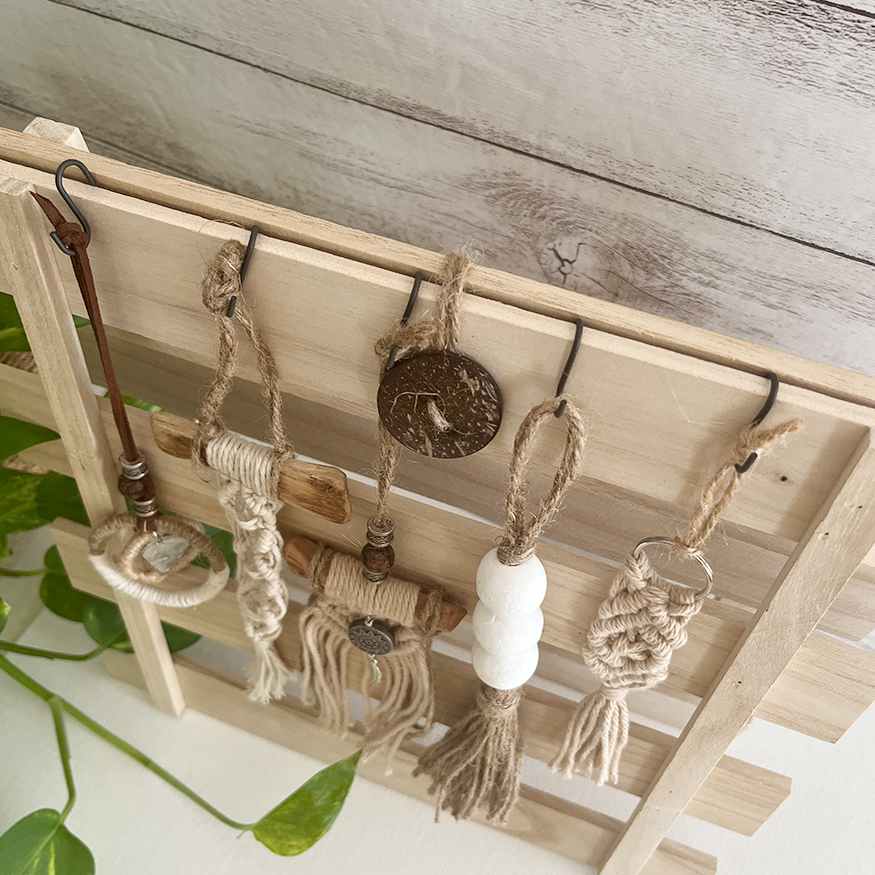
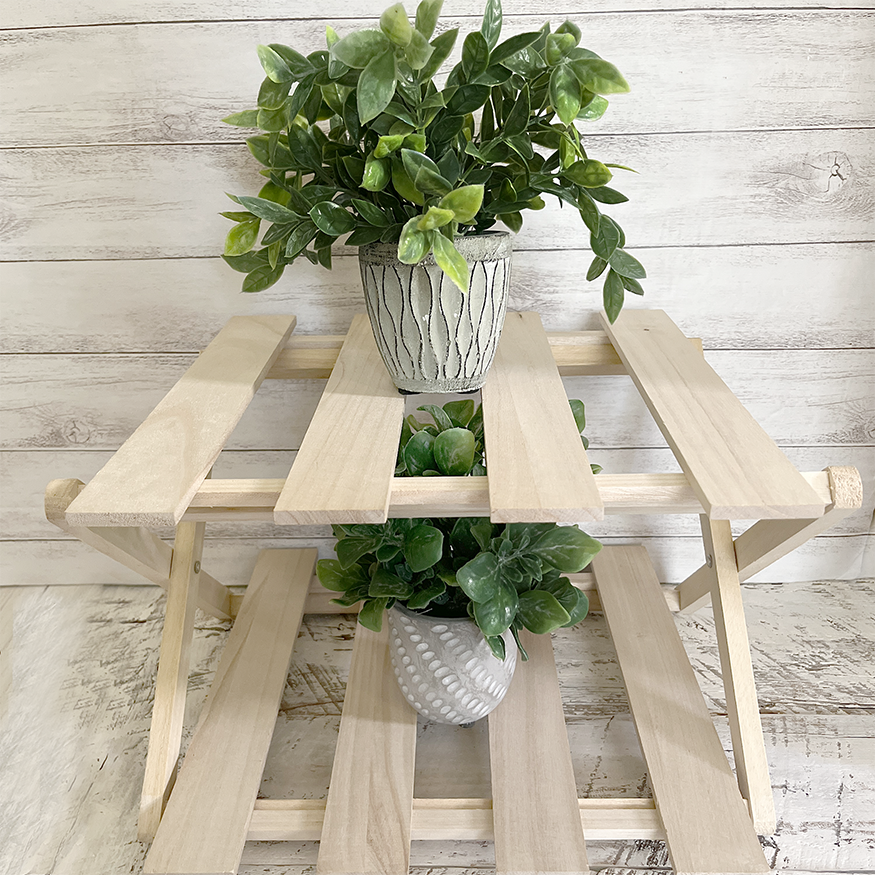
As an Amazon Associate I earn from qualifying purchases. Please read my Amazon Associates Program for more info Are you ready to infuse your home decor with a touch of boho charm? Look no further than our DIY Sunoko panel display stand tutorial. This creative project combines traditional Japanese woodworking with modern interior aesthetics, resulting in a unique and eye-catching piece that's sure to be a conversation starter. What is Sunoko? Sunoko, also known as a wooden grate or duckboard, is a traditional Japanese element used in flooring and ventilation. Its distinct grid pattern allows for both functionality and style. In this DIY project, we'll reimagine the Sunoko as a miniature wooden pallet, perfect for creating a stand that beautifully showcases small accessories. Where can you get? You can find Sunoko panels at affordable prices, such as at Daiso stores.
Crafting Your Boho Display Stand Creating your Sunoko panel display stand is easier than you might think. Follow these simple steps to craft a stylish piece of home decor. 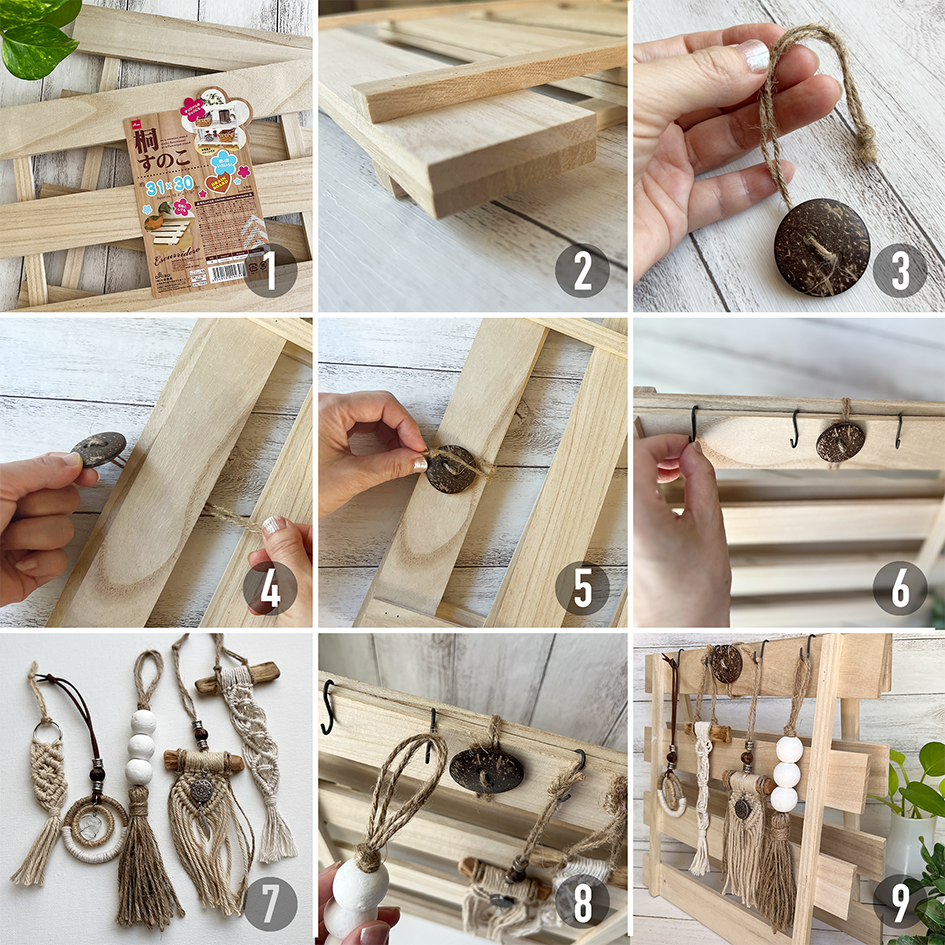 Instructions:
A delightful mini wooden pallet display stand that adds a boho touch to your home decor. Feel free to experiment with different accessories and colors to create a unique and personalized display that complements your interior style. Enjoy your crafting! Transforming traditional Japanese Sunoko panels into a boho display stand is a fantastic way to add character and creativity to your home decor. Embrace the fusion of cultures and styles with this easy DIY project. Show off your crafty skills and elevate your space with a touch of bohemian charm. You can find Sunoko panels at affordable prices, such as at Daiso stores. Please note that any crafts or DIY projects should be attempted with caution. More Ideas Using Sunoko Panels Expand your creative horizons with additional projects using Sunoko panels:
Explore More Easy & Creative Projects:
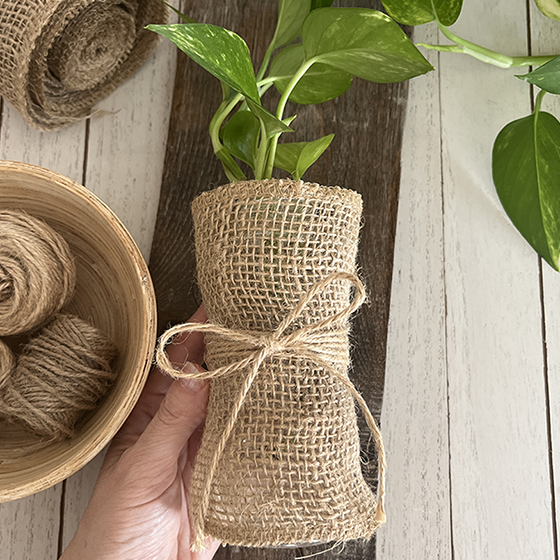
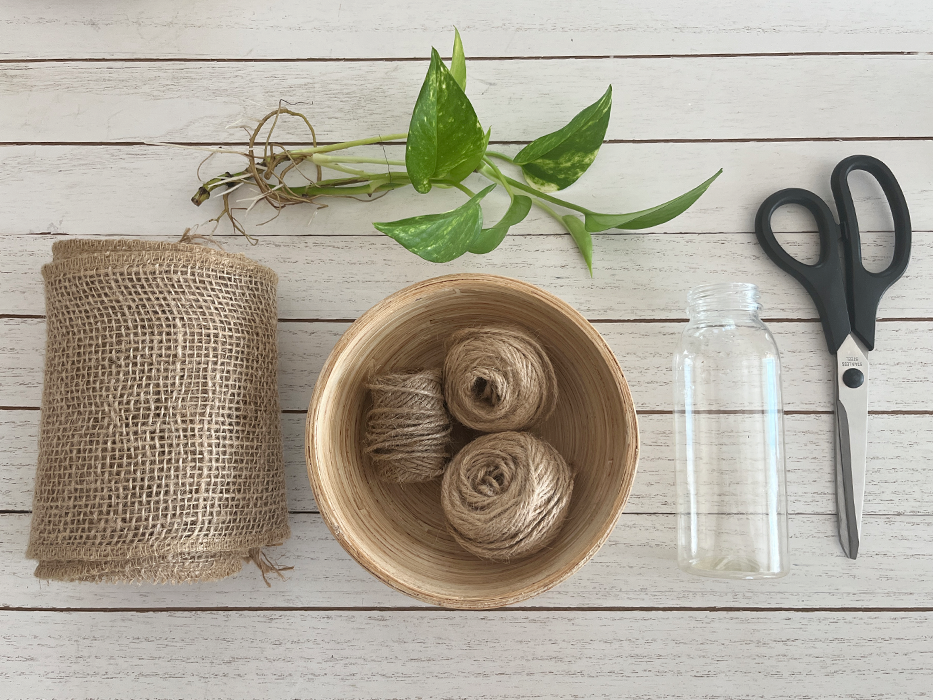
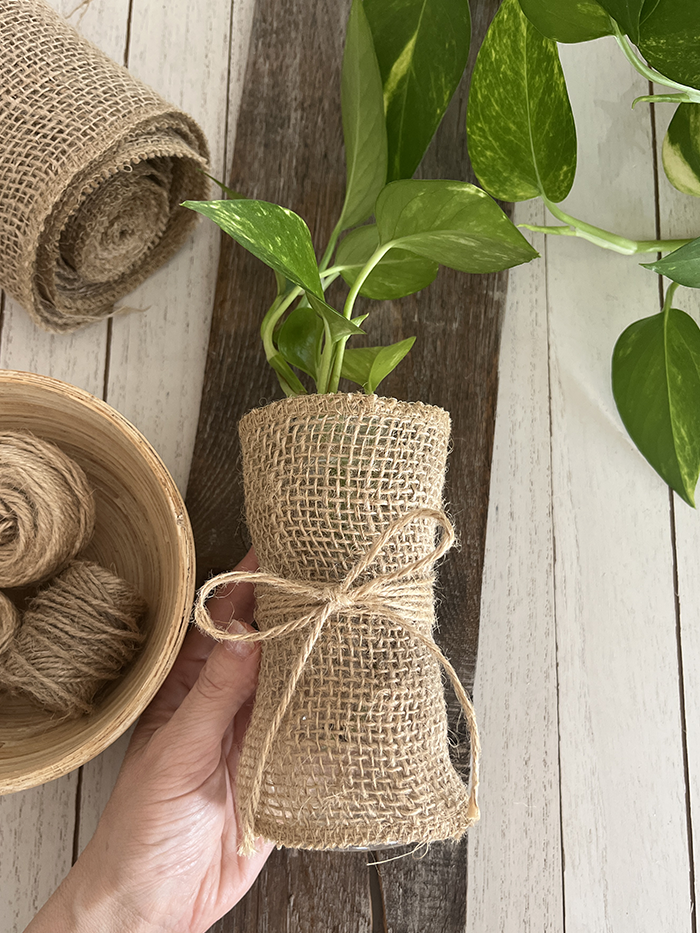
DIY Jute Hanging Vase: Easy, Affordable, and Rustic Plant Holder from Reused Plastic Bottle8/4/2023 As an Amazon Associate I earn from qualifying purchases. Please read my Amazon Associates Program for more info Discover the step-by-step guide to creating a charming jute hanging vase for your beloved plants. In this fun and eco-friendly DIY project, learn how to repurpose a small plastic bottle and transform it into a rustic and stylish plant hanger using jute. This creative and affordable craft not only adds a touch of nature to your living space but also helps reduce plastic waste. For another easy jute-based DIY project, check out "DIY Jute Wrapped S-Hooks: Boho Charm for Your Home Decor" Elevate your home decor with boho-inspired charm using jute-wrapped S-hooks, adding a unique and natural flair to your space. Let's embark on this delightful endeavor and elevate your greenery in a sustainable and beautiful way!
Creating Jute Hanging Vase 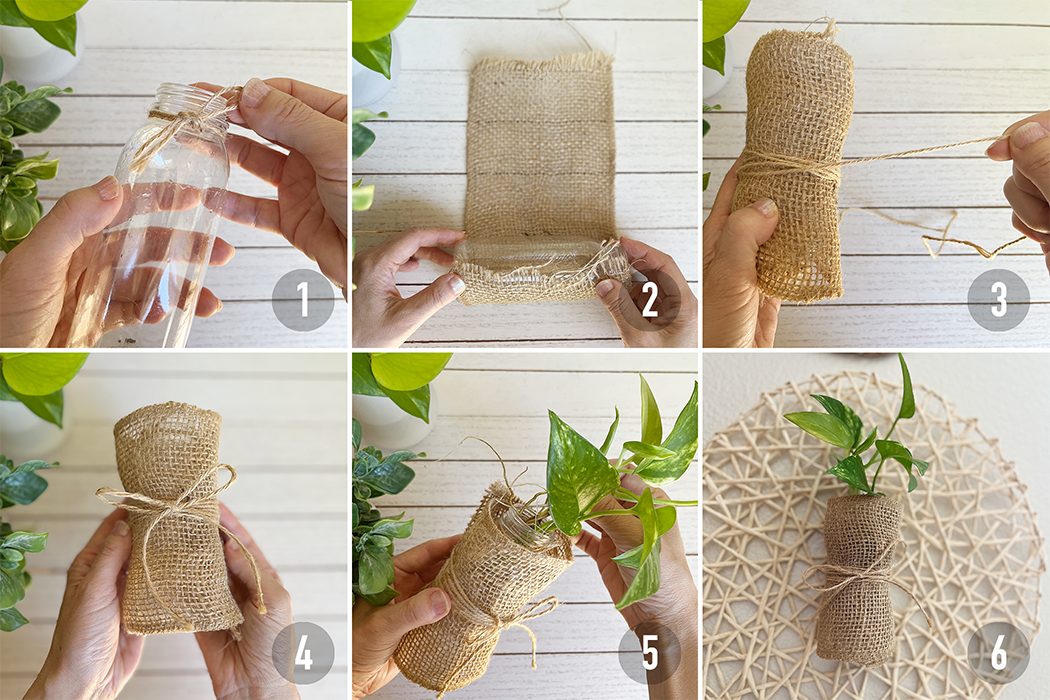 Instructions:
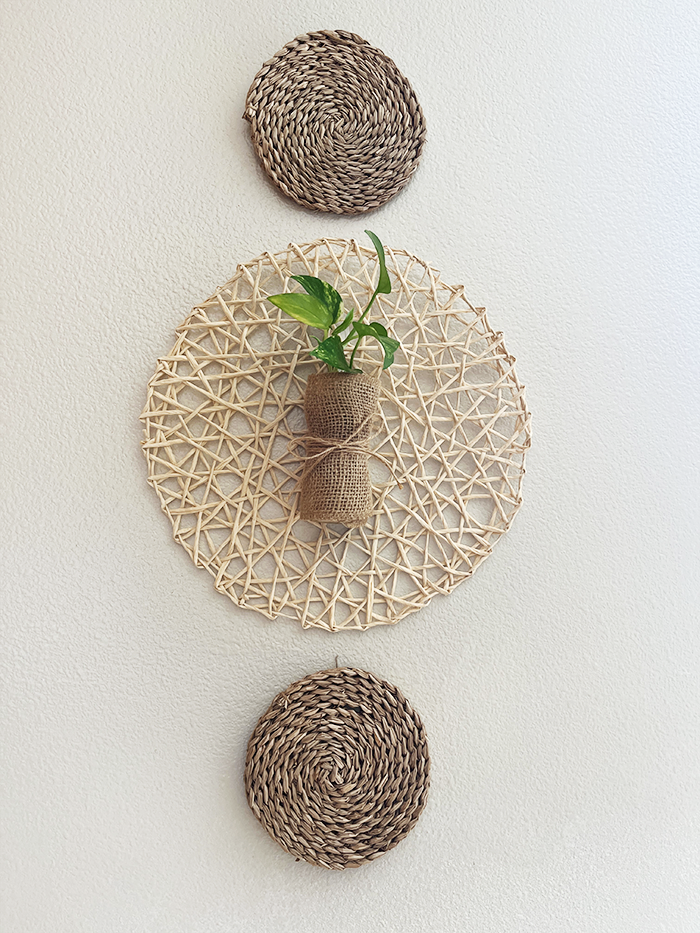
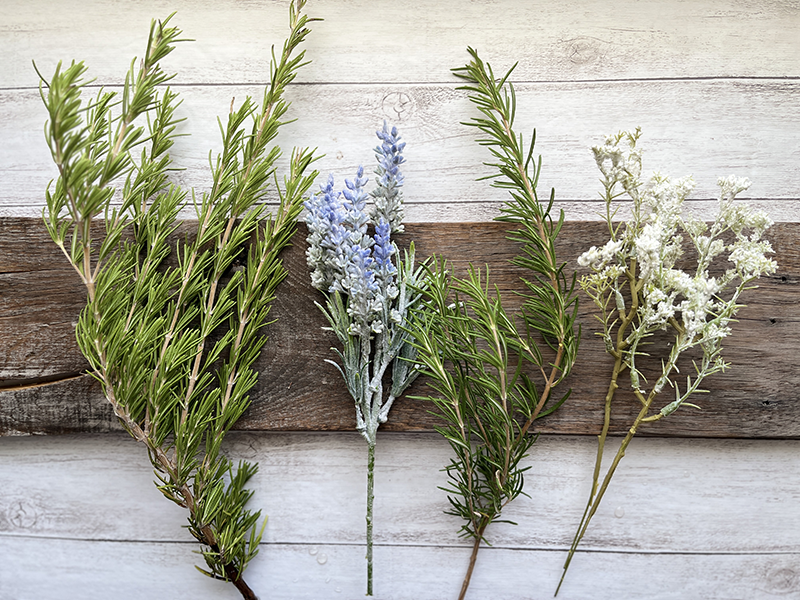
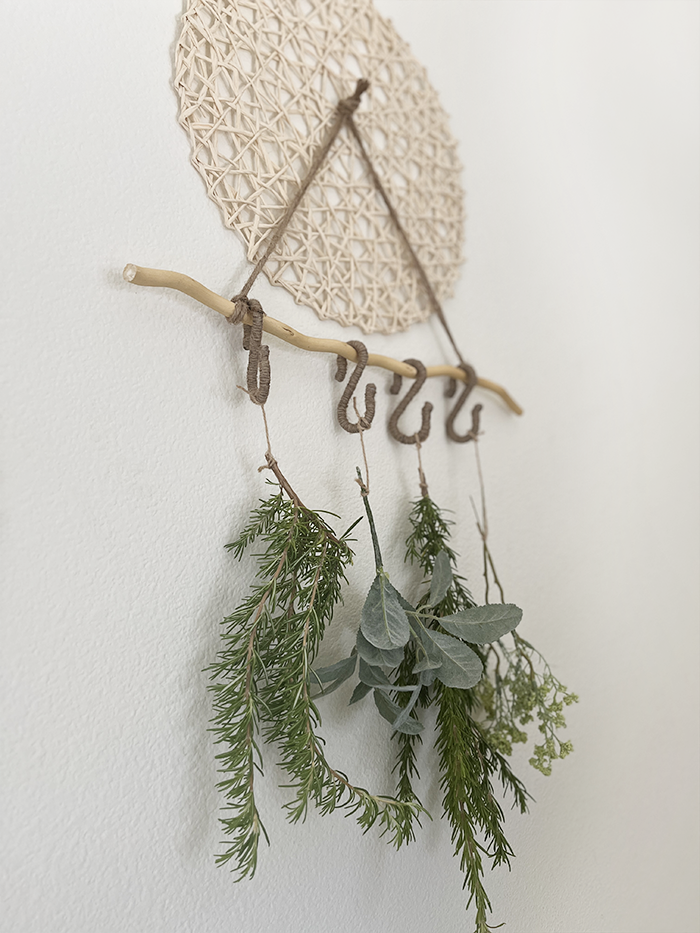
Maintenance Tips: To keep your jute hanging vase looking fresh and your plant thriving, remember to water it according to your plant's needs. Take the plant out of the vase for watering, and ensure that any excess water drains completely before placing it back in the vase. Regularly trim and care for your plant to maintain its health and appearance. Decoration Ideas 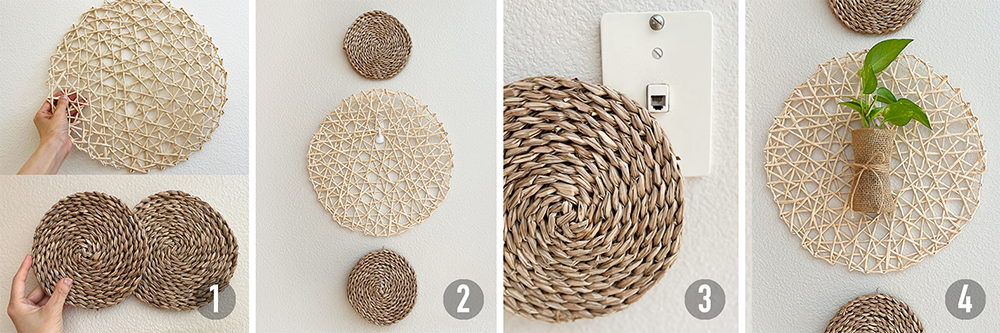 Instructions:
With these creative decoration instructions, you'll have a stunning and unique display that beautifully showcases your DIY jute hanging vase. This artistic and eco-friendly setup is sure to become a focal point in your home, adding warmth and character to your living space. Enjoy the process of expressing your creativity and bringing a touch of nature indoors with this delightful craft! Please note that any crafts or DIY projects should be attempted with caution
As an Amazon Associate I earn from qualifying purchases. Please read my Amazon Associates Program for more info.
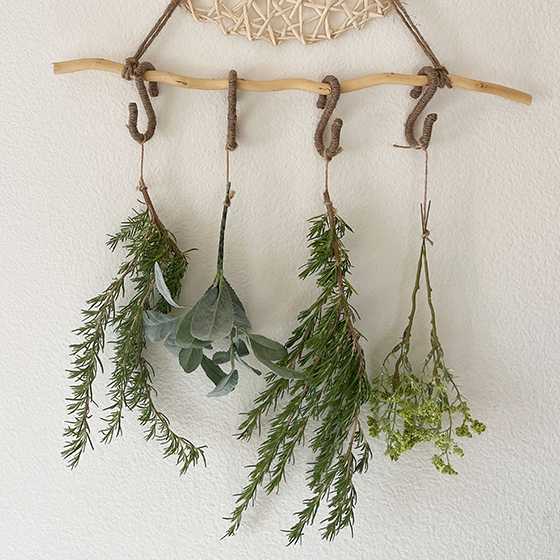
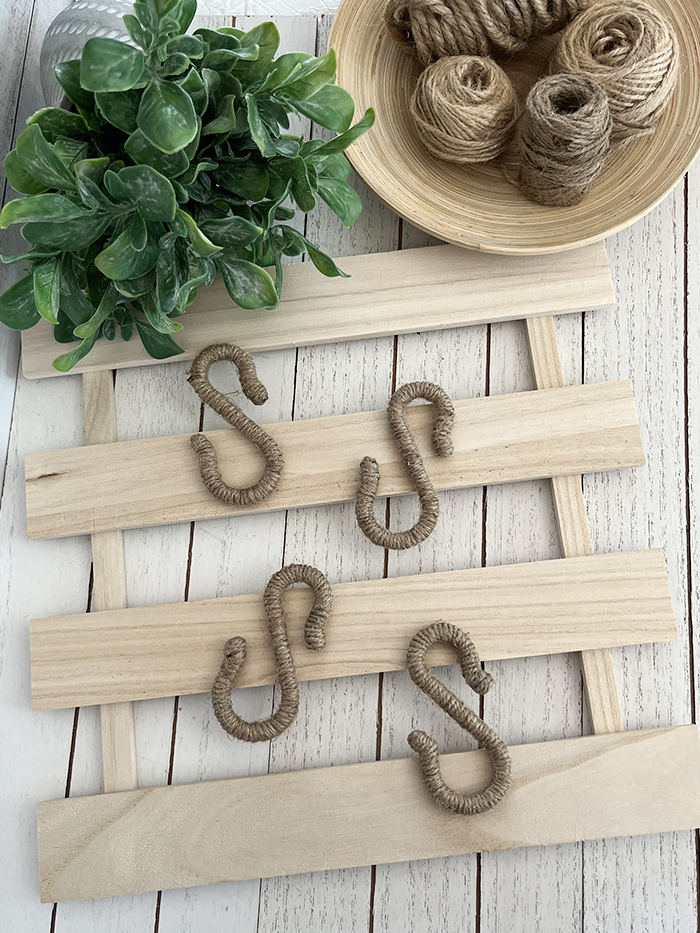
Looking to infuse a touch of boho charm into your home decor? If you're a fan of simple, yet stylish crafts, this DIY project is perfect for you! With just a few basic materials and a little effort, you can create earthy jute-wrapped S-hooks that will add a natural and rustic appeal to any space. This simple and creative DIY endeavor is not only enjoyable but also a great way to personalize your home with a touch of handmade elegance.
This step-by-step tutorial will guide you through the process of crafting these enchanting jute-wrapped S-hooks. These versatile hooks can be used to hang a variety of items, from plants and decorative pieces to towels and accessories. Whether you're a seasoned crafter or new to DIY projects, this delightful endeavor is sure to spark your creativity and inspire you to transform ordinary objects into captivating pieces of boho-inspired accessories. So, let's dive into this easy and fun DIY project and bring the rustic elegance of jute to your home decor!
Creating Jute Wrapped S-Hooks

Instructions:
Please note that any crafts or DIY projects should be attempted with caution
Decoration ideas
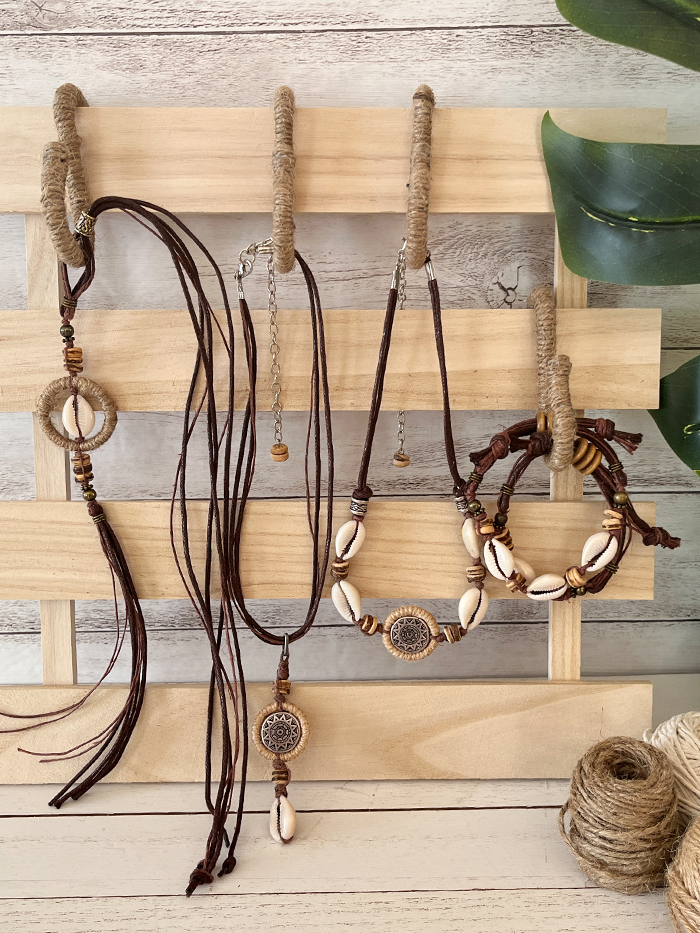
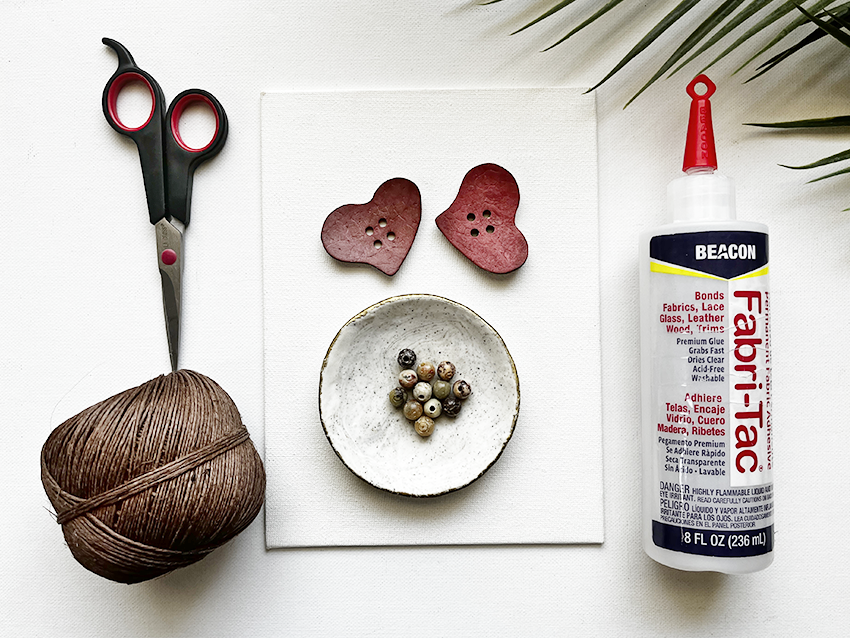
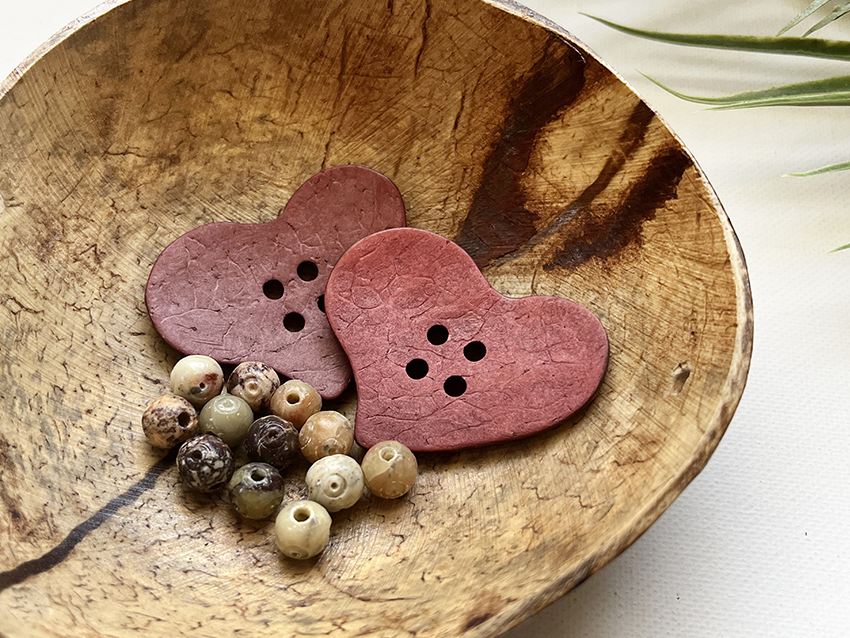
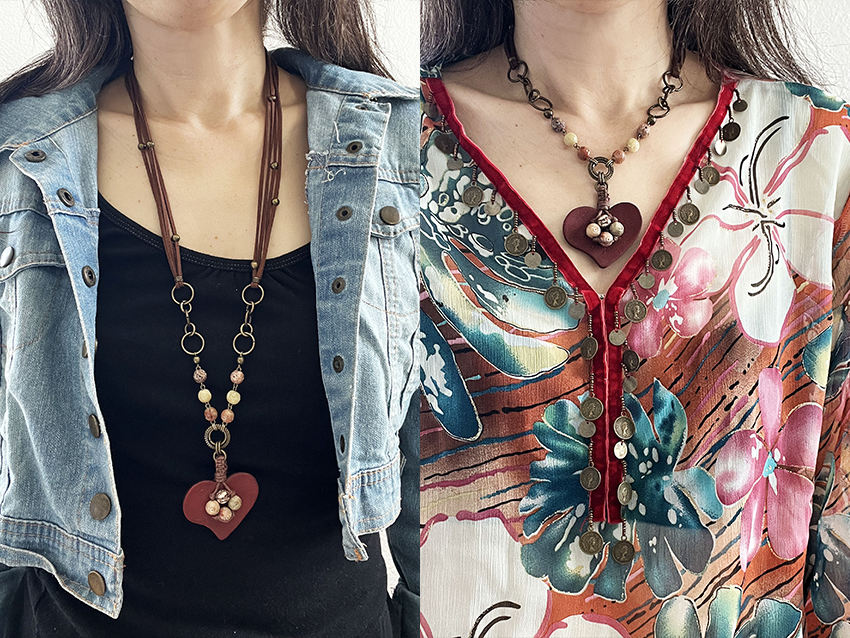
As an Amazon Associate I earn from qualifying purchases. Please read my Amazon Associates Program for more info. Learn how to create a beautiful heart-shaped pendant using coconut shell buttons and macrame techniques, as featured in Belle Armoire Jewelry Winter 2021. This DIY tutorial provides detailed step-by-step instructions to help you craft a unique and eco-friendly accessory. Follow along and discover the joy of making your own stylish jewelry. Check out my ETSY shop for the exact pendant used in this tutorial!
Please select beads with LARGE HOLES to easily thread cords like hemp cord and faux suede. Ensure the holes accommodate both cords for a secure bracelet. If the bead hole is not sufficiently large, you may want to consider using a 10LB HEMP CORD instead. Creating Your Hemp Cord Pendant  Instructions:
Macrame Square Knot  Instructions:
Repeat these steps, starting with step 2, to create as many square knots as desired. Please note that any crafts or DIY projects should be attempted with caution
|
Author
Archives
November 2023
Categories |


 RSS Feed
