
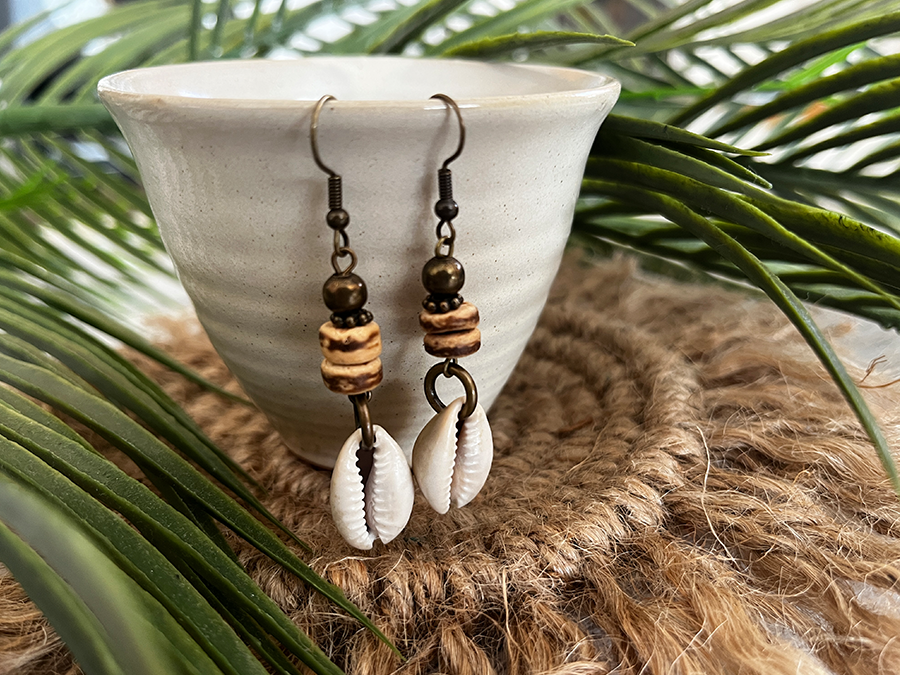
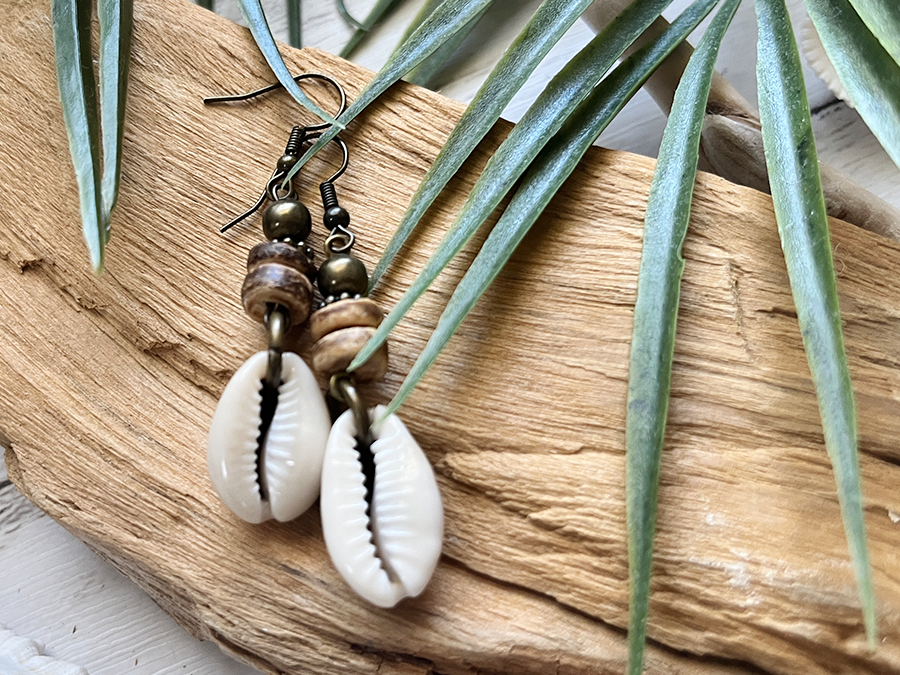
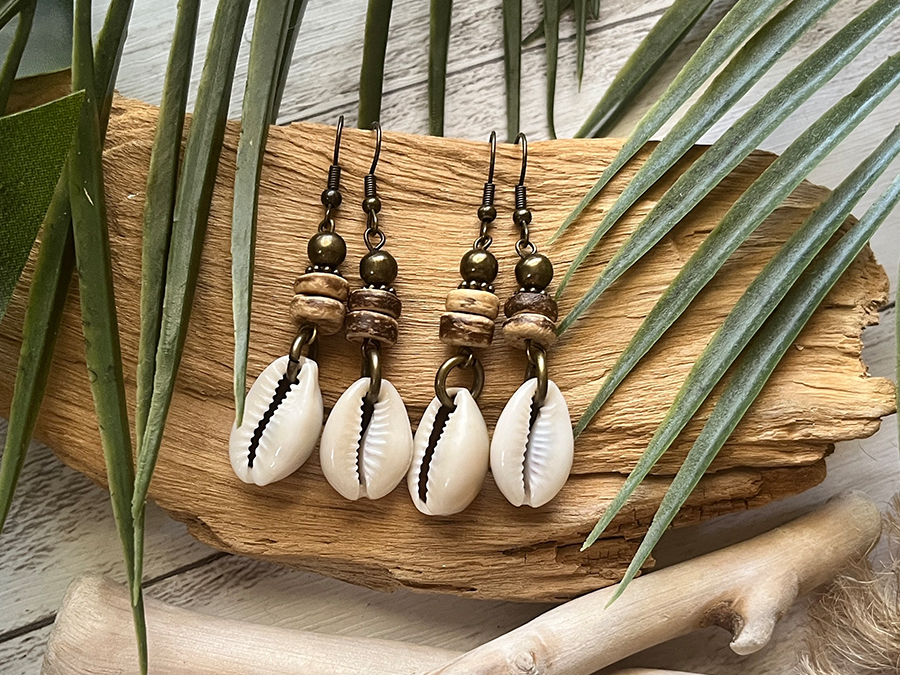
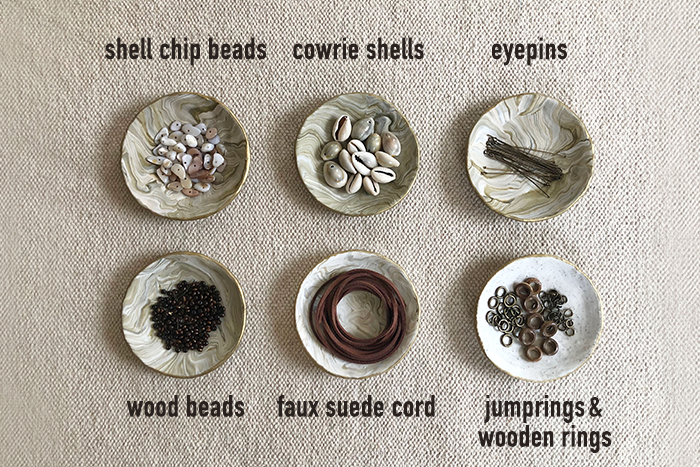
Unlocking Boho Vibes: Craft Your Own Earthy Cowrie Shell Earrings for a Beachy Summer Look5/16/2023 Get ready to embrace the carefree spirit of summer and infuse your style with a touch of boho elegance! In this tutorial, I will guide you through creating your own cowrie shell earrings that perfectly capture the essence of beachy vibes. Whether you're aiming to make a fashion statement or seeking a unique accessory for a beachside getaway, these earrings will become your go-to choice. So, grab your tools and let's dive into this mesmerizing jewelry-making adventure that's bound to leave you with earthy cowrie shell earrings, evoking the spirit of endless summers and sun-kissed shores. Let the boho vibes inspire you as you embark on this beautiful crafting endeavor. Check out my ETSY shop for the exact earrings used in this tutorial!
Making cowrie shell earrings 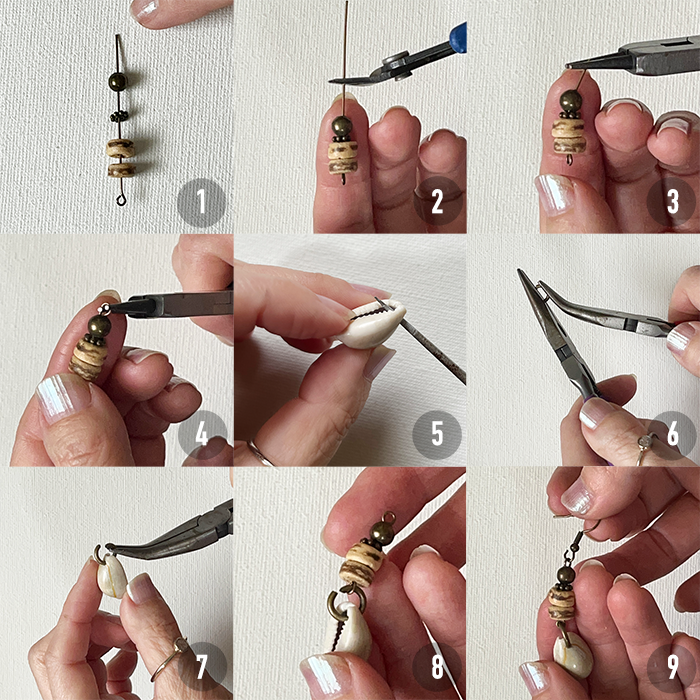 Instructions:
Repeat steps 2-9 to create a matching earring. Once both earrings are complete, use pliers to adjust any loops or connections as necessary, ensuring the earrings hang evenly. Please note that any crafts or DIY projects should be attempted with caution
1 Comment
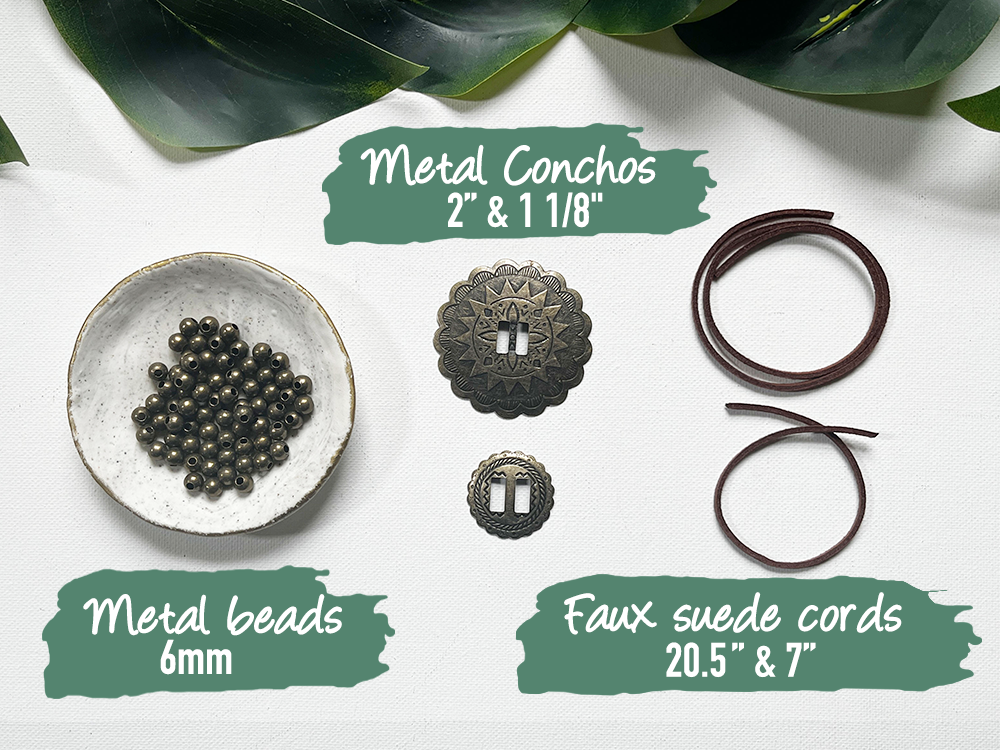
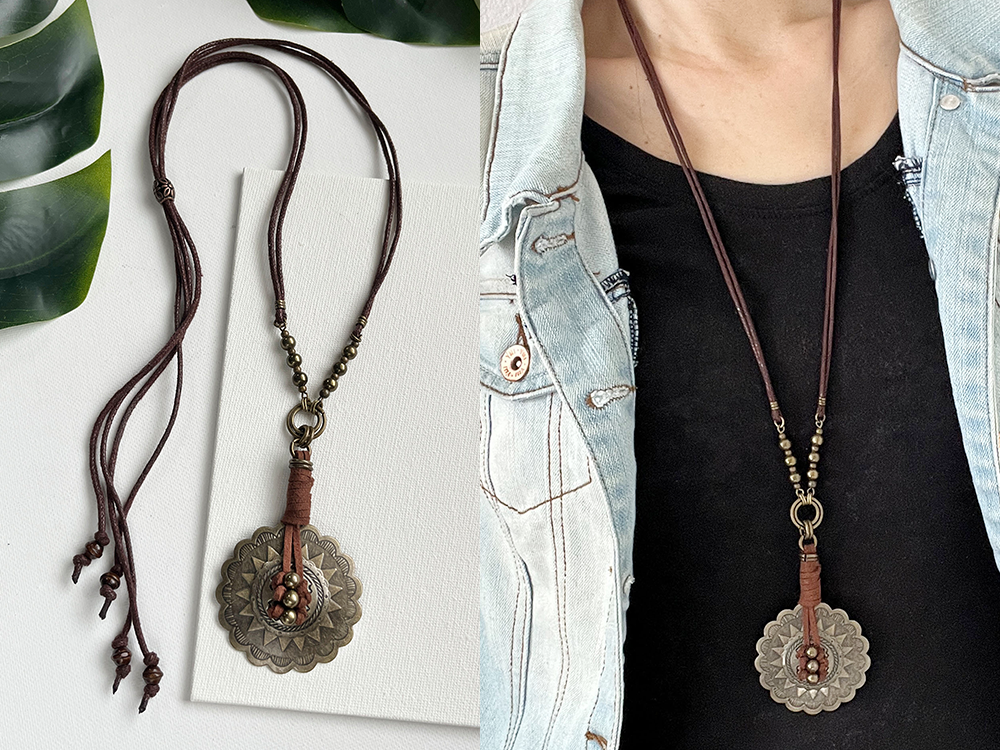
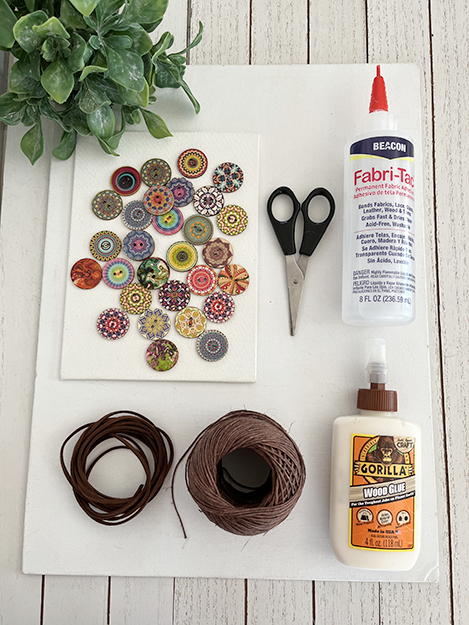
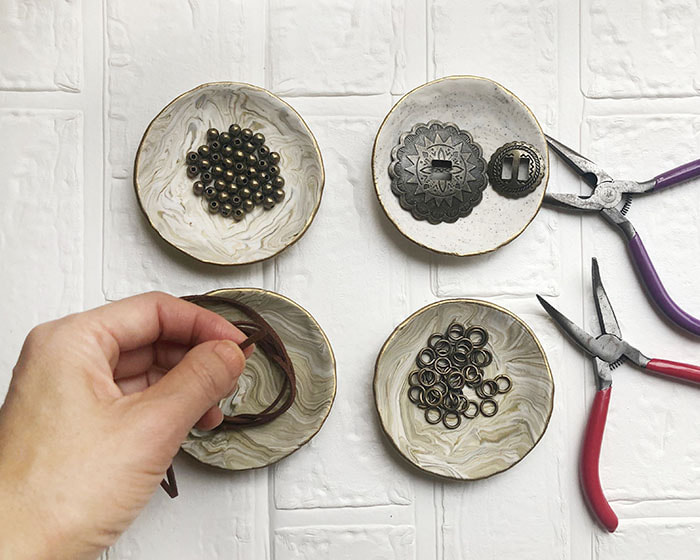
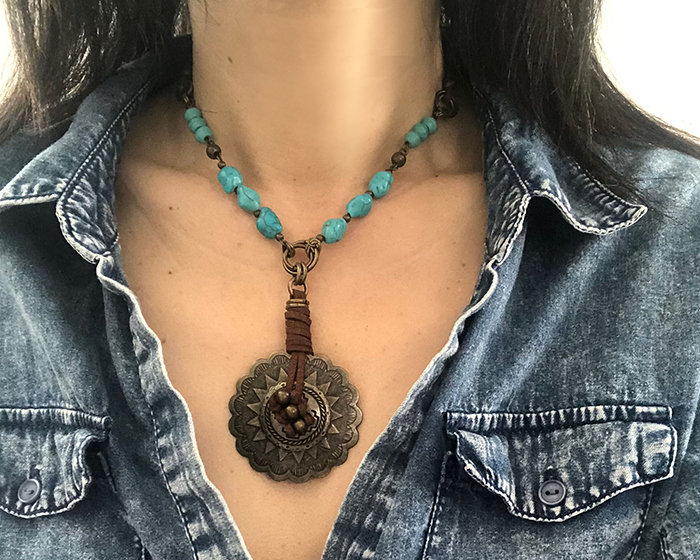
As an Amazon Associate I earn from qualifying purchases. Please read my Amazon Associates Program for more info. Are you looking to add some boho-chic flair to your jewelry collection? Look no further than the DIY concho pendant! With just a few simple materials and some easy-to-follow steps, you can create a stunning pendant that will complement any outfit. In this tutorial, I'll show you how to make a beautiful concho pendant using faux suede cord, metal beads, and metal conchos. Grab your pliers and get ready to create your own unique accessory! Check out my ETSY shop for the exact pendant used in this tutorial!
Making a Concho Pendant 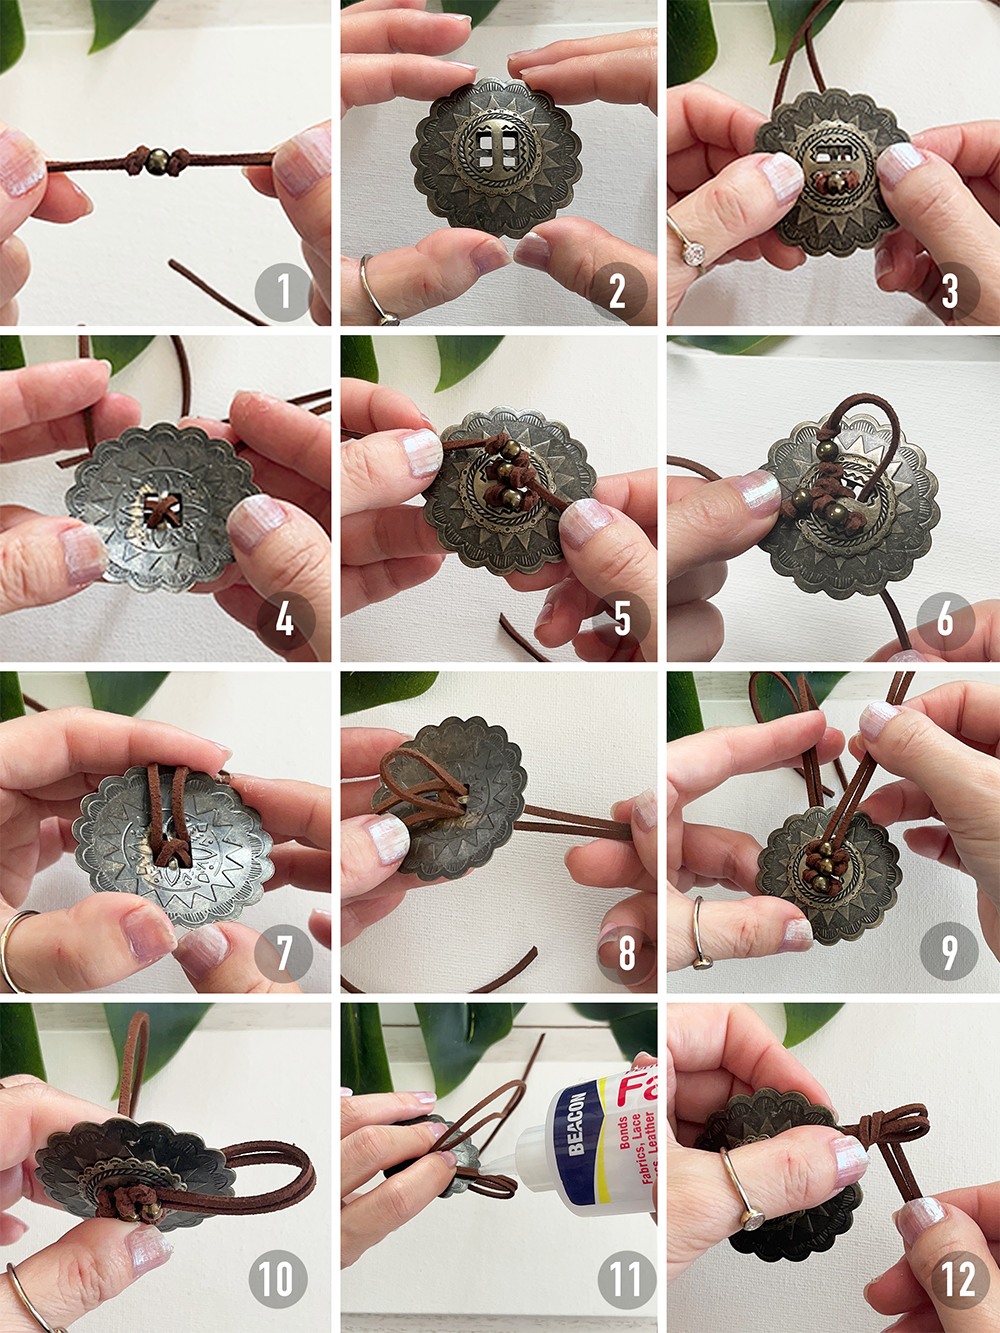 Instructions:
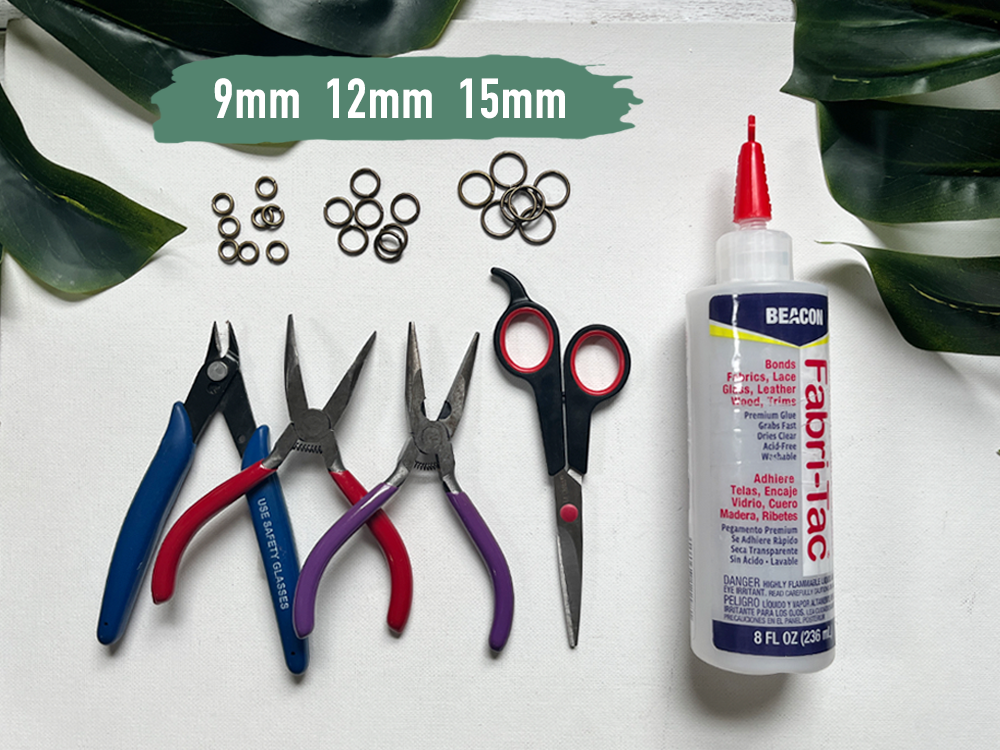
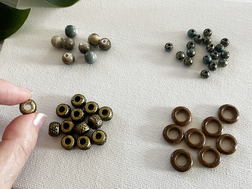
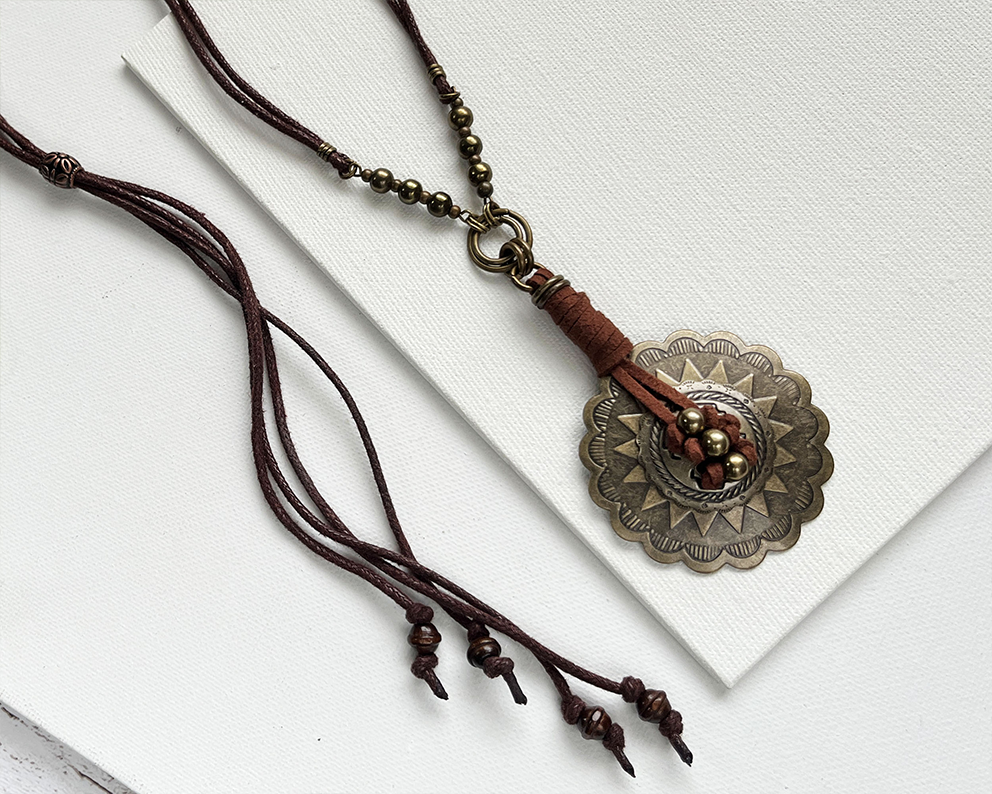
Attaching Heavy Gauge Jump Rings to the Concho Pendant as a Bail  Instructions:
Please note that any crafts or DIY projects should be attempted with caution I love this technique - it's a unique way to attach a bail to your concho pendant using jump rings. Not only is it easy to do, but it also adds an interesting dimension to your jewelry piece. Plus, you can customize it by using different sizes of jump rings to suit your style. Give it a try and see how it turns out!
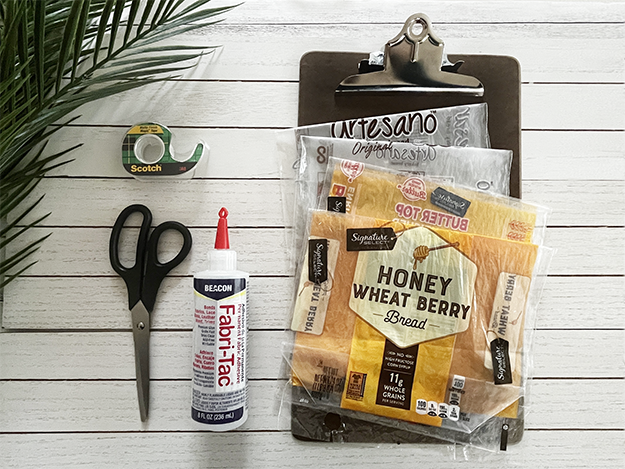
Recycling with Style: How to Make Eco-Friendly Yarn-Wrapped Bracelets Using Plastic Grocery Bags4/2/2023 As an Amazon Associate I earn from qualifying purchases. Please read my Amazon Associates Program for more info. If you're looking for a creative way to upcycle your plastic grocery bags, then you'll love this eco-friendly DIY project! With just a few supplies, you can transform those bags into a boho-chic bangle bracelet that's perfect for any casual occasion. Not only is it stylish, but it's also a great way to repurpose those plastic bags that would otherwise end up in landfill. Give it a try and see how easy it is to turn trash into treasure!
Creating bangle bracelets using plastic grocery bags  Instructions:
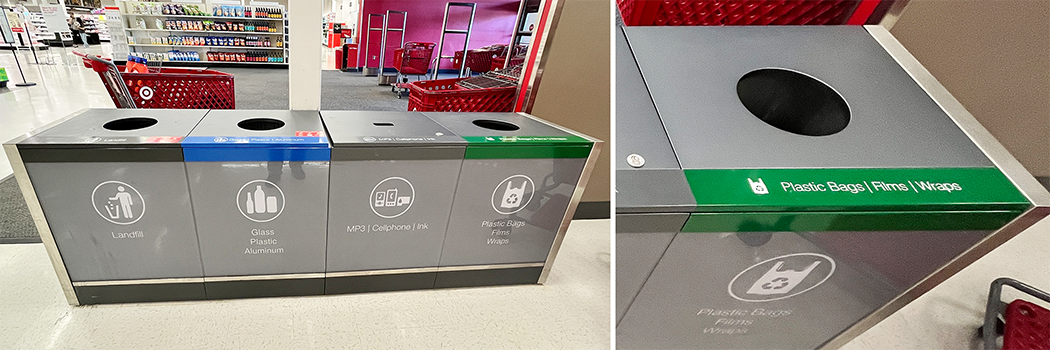
Let the glue dry completely before wearing your new plastic bag bracelet. Enjoy! Please note that any crafts or DIY projects should be attempted with caution. Want to make more eco-friendly bracelets using plastic grocery bags? Check out the previous blog post on DIY Rustic Jute Cord Bracelets from Reused Plastic Bags - A Fun and Eco-Friendly Project that's both stylish and sustainable. Recycling Plastic Bags at Retail Stores
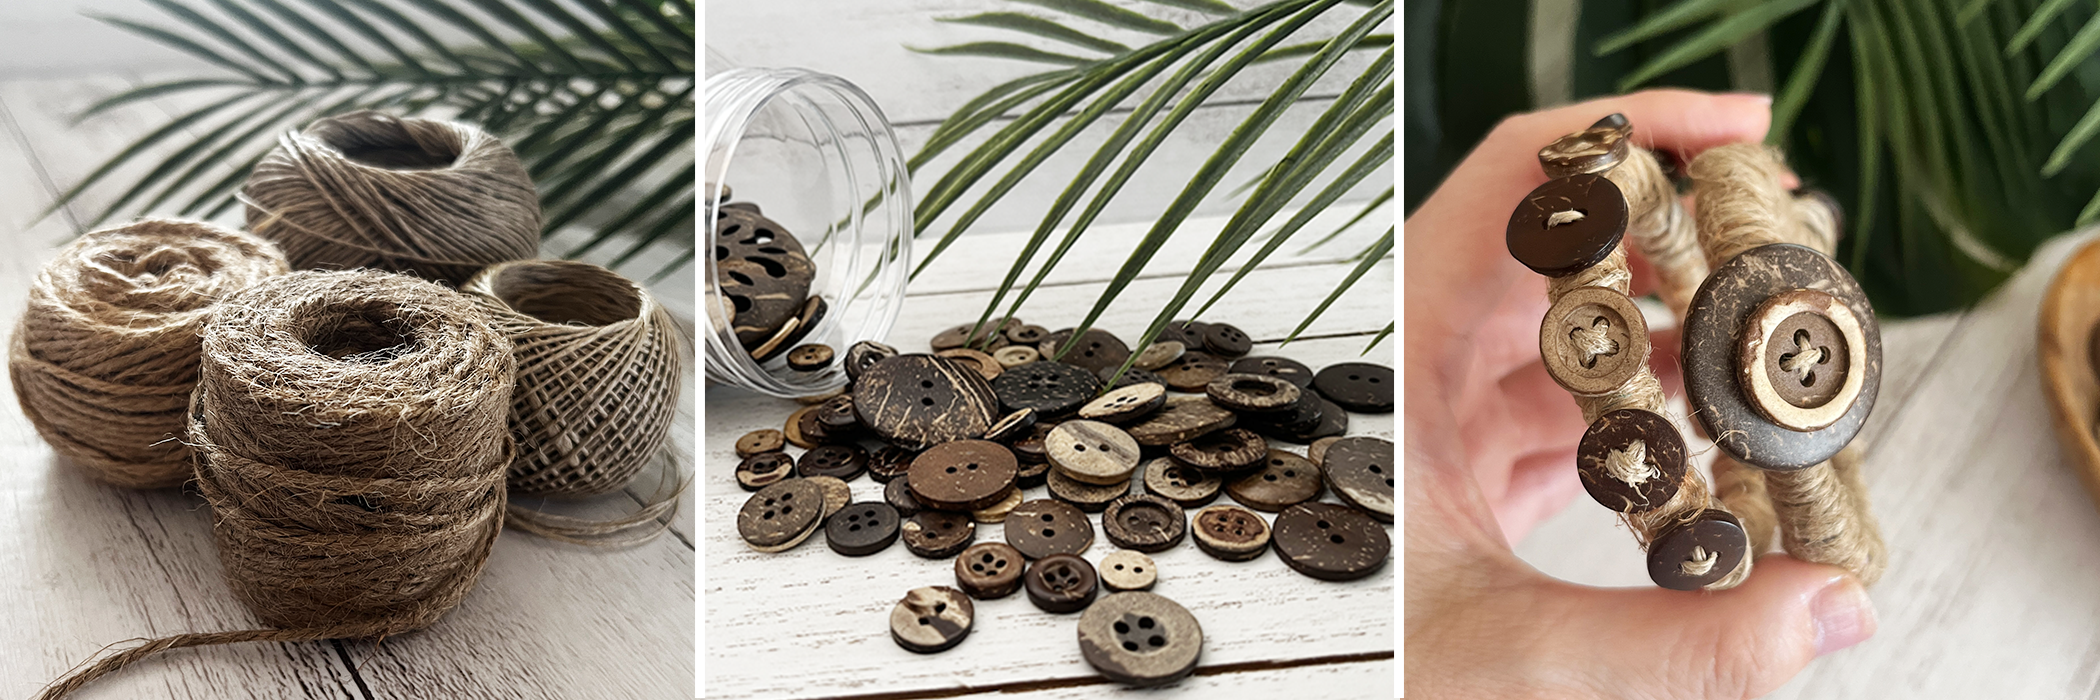
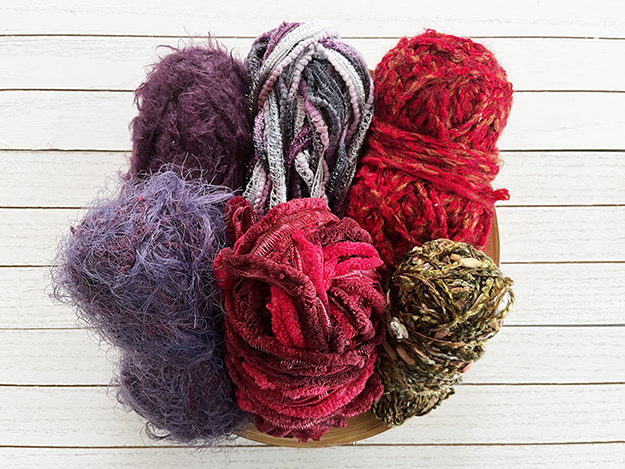
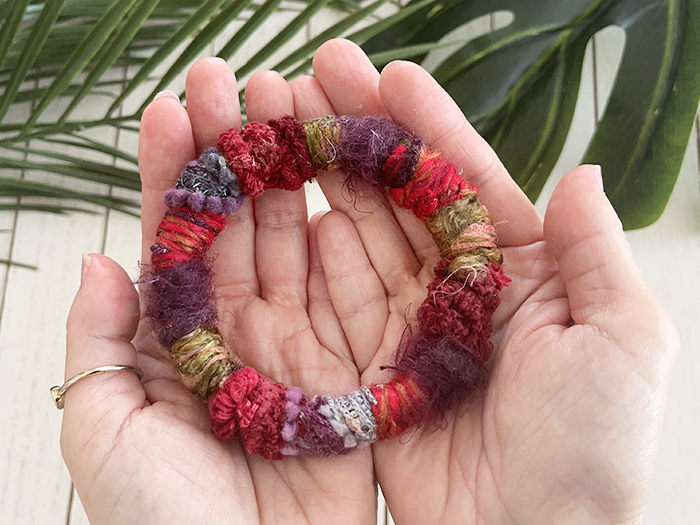
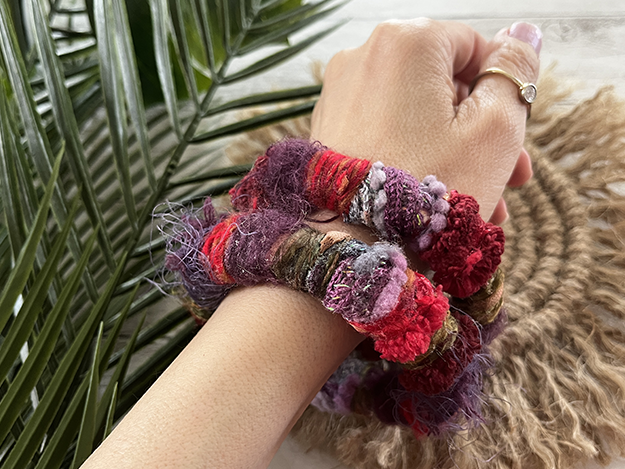
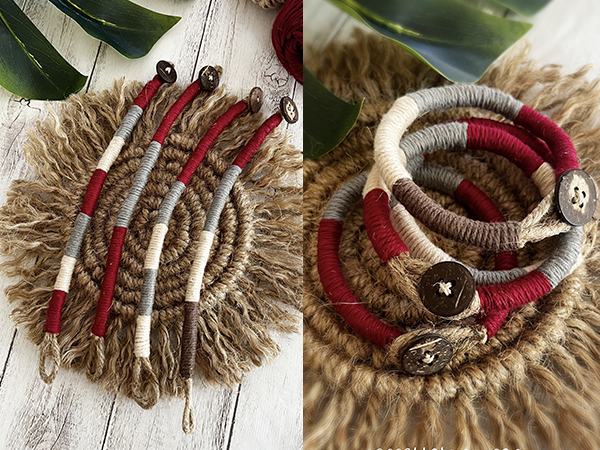
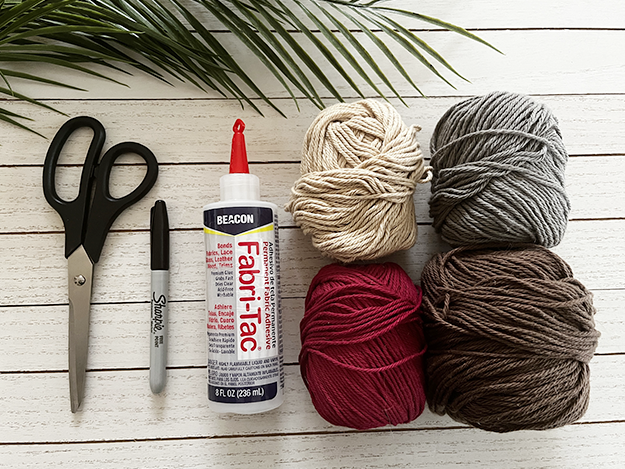
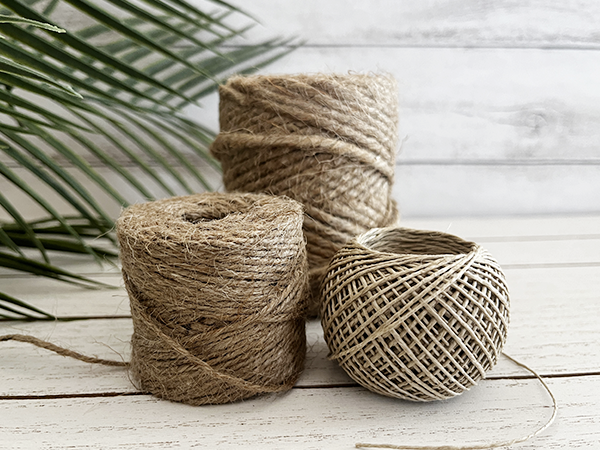
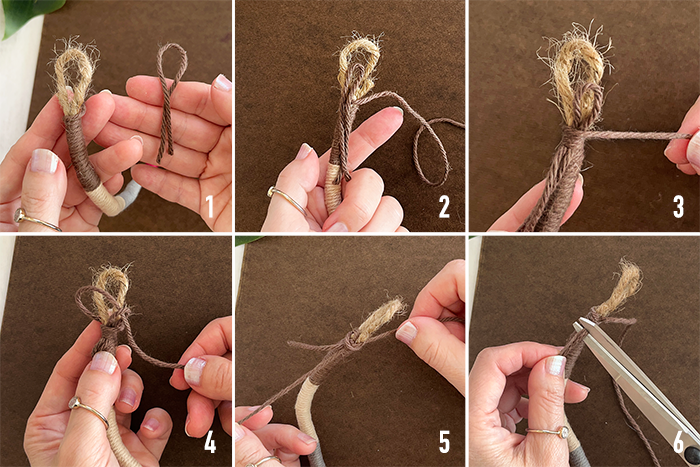
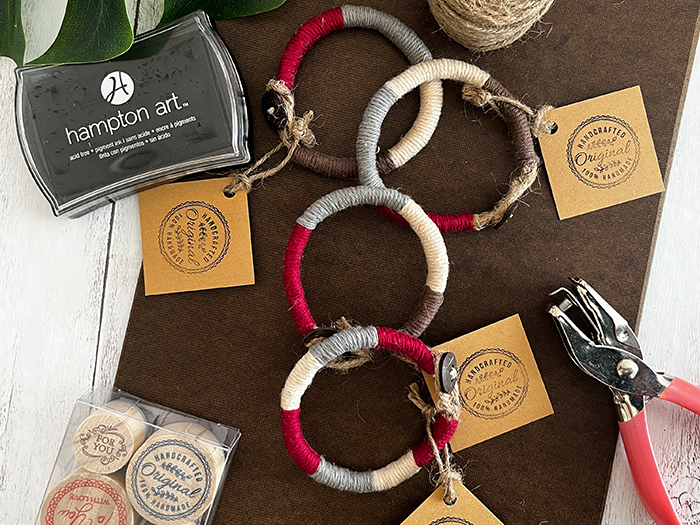
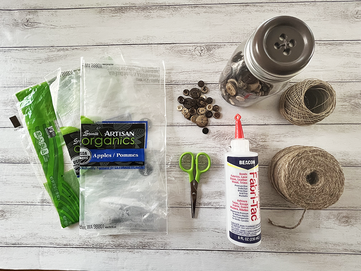
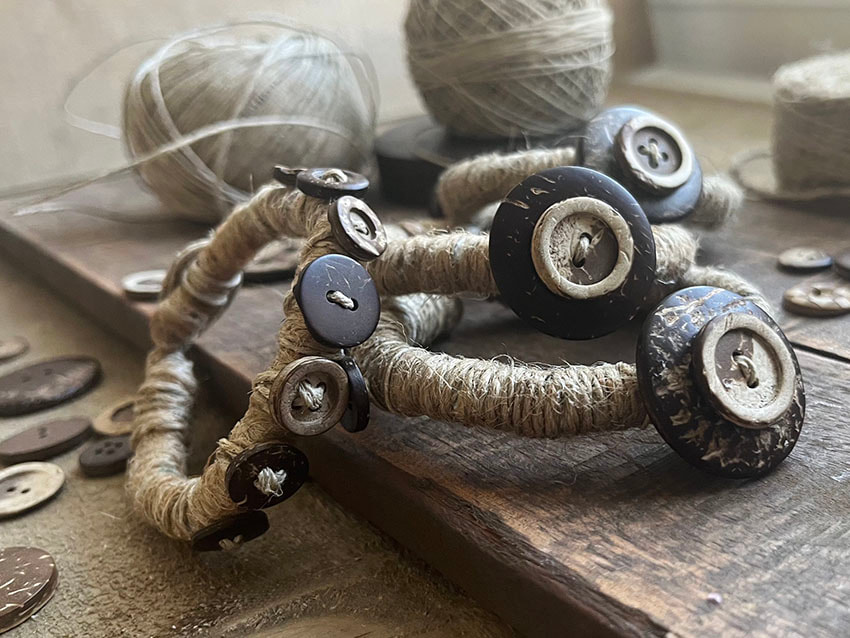
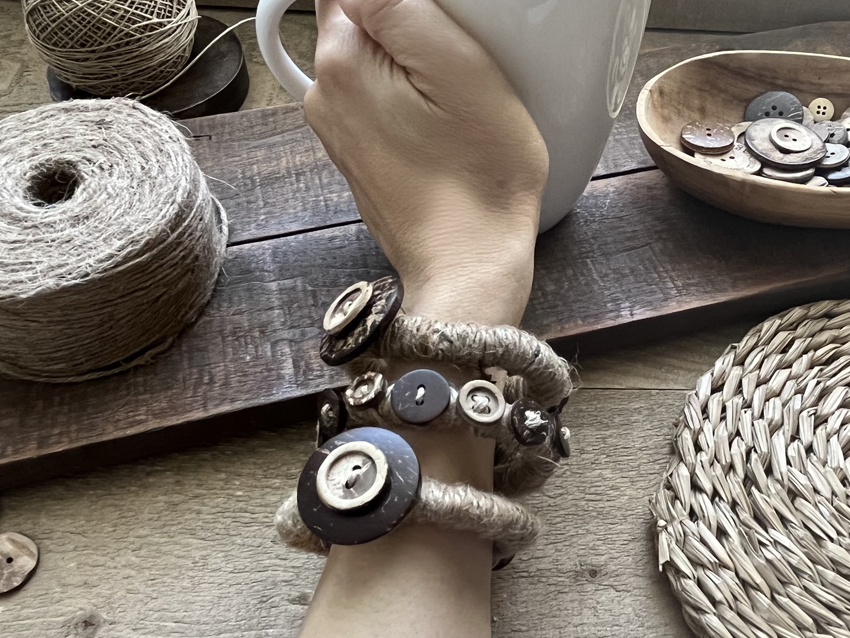
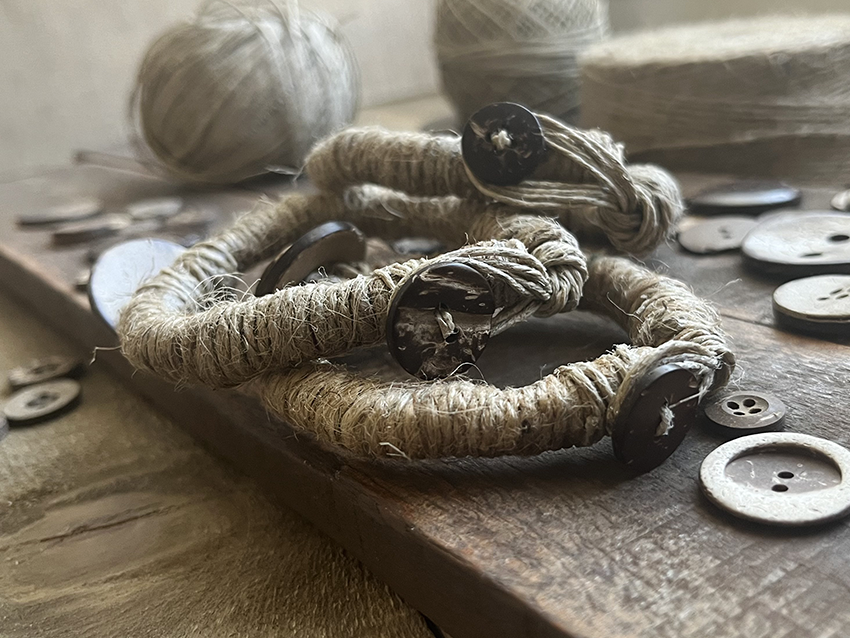
As an Amazon Associate I earn from qualifying purchases. Please read my Amazon Associates Program for more info. Looking for a fun and easy DIY project? Try making an earthy bracelet by wrapping cotton yarn around a jute rope. To make this project, you'll need jute rope, cotton yarn, coconut shell buttons, a hemp cord, and basic craft supplies. Medium size 4 cotton yarn is recommended as it is lightweight and easy to work with. Plus, it's widely available and affordable, making it perfect for this project. If you're interested in fundraising, making your own jewelry is a great idea. And to add a personal touch to your creations, you can make handmade tags using simple supplies. Handmade tags can really make your items stand out. In the video, I share a DIY tag idea using kraft paper (65lb./lightweight card stock), but you can use heavier-weight kraft paper like 80-100lb, or any card stock you already have. I hope you enjoy creating your own earthy bracelet and experimenting with different tag ideas. Have fun with your new craft project!
Creating earthy bracelets
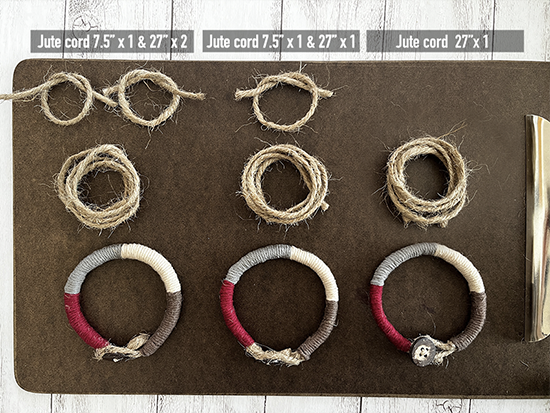
If you want a thicker bracelet, you can add more pieces of jute rope to the original piece. In the picture, you can see three different thicknesses of bracelets that were made by adding different amounts of jute rope. Although they may look almost identical, when you touch them, you can feel the difference in thickness. By experimenting with different thicknesses, you can find the one that is just right for you. A thicker bracelet may feel more substantial and make more of a statement, while a thinner bracelet may be more delicate and subtle. Ultimately, the choice is yours and depends on your personal style and preferences. 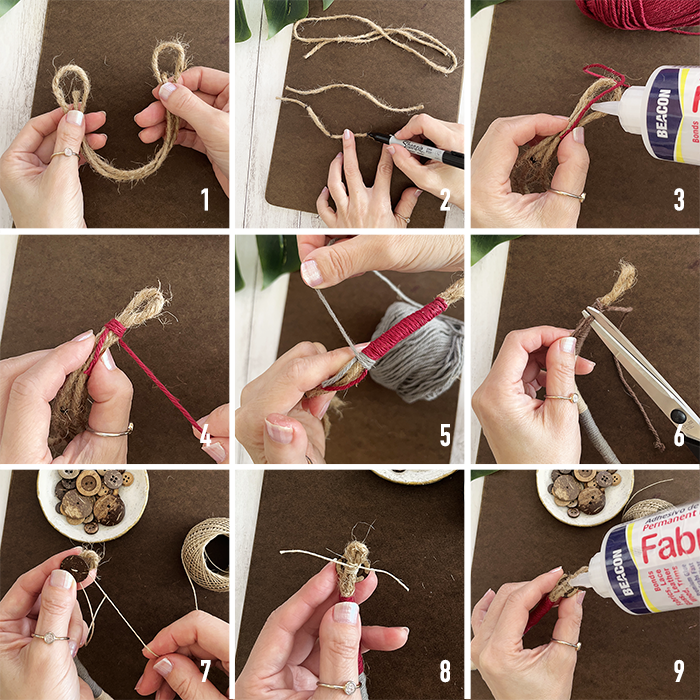 Instructions:
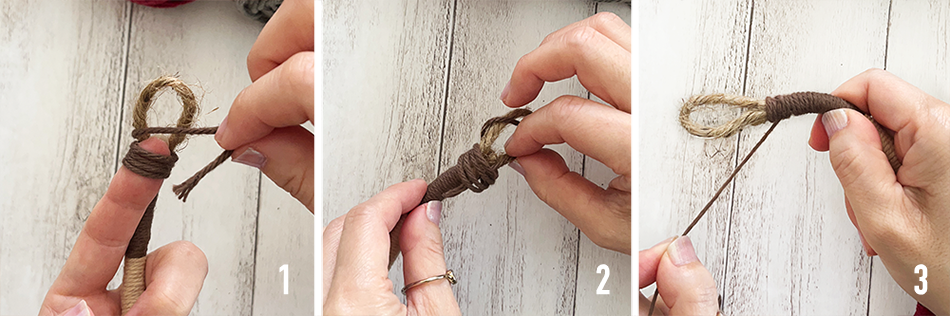
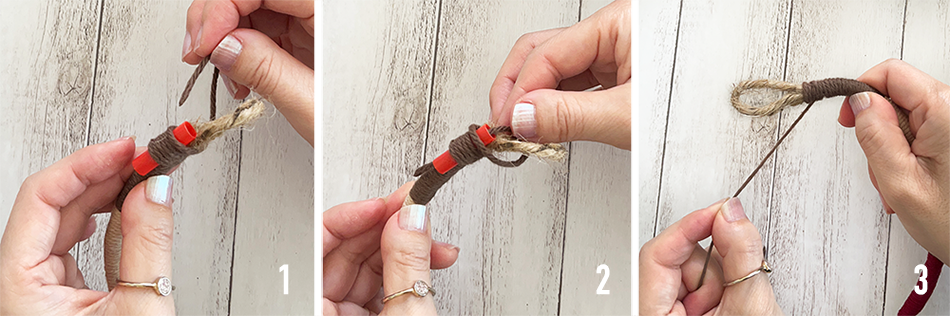
Your DIY earthy button and loop closure bracelet is now complete and ready to wear! Tip: Apply a small amount of clear nail polish to the ends of the jute rope to prevent fraying. (Optional: See the pictures below) Tying the cord end
Feel free to experiment with these three different methods to find the one that works best for you. Preventing Jute Rope from Fraying with Clear Nail Polish (Optional) 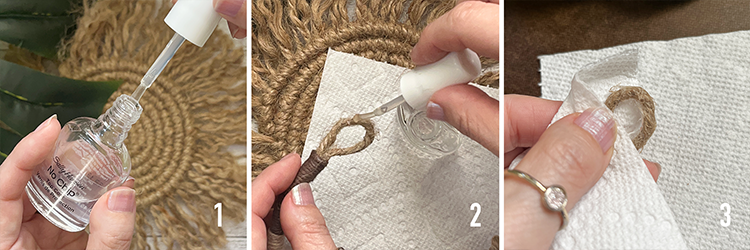 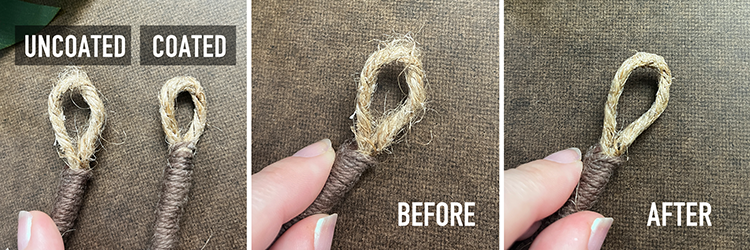
Creating simple handmade tags
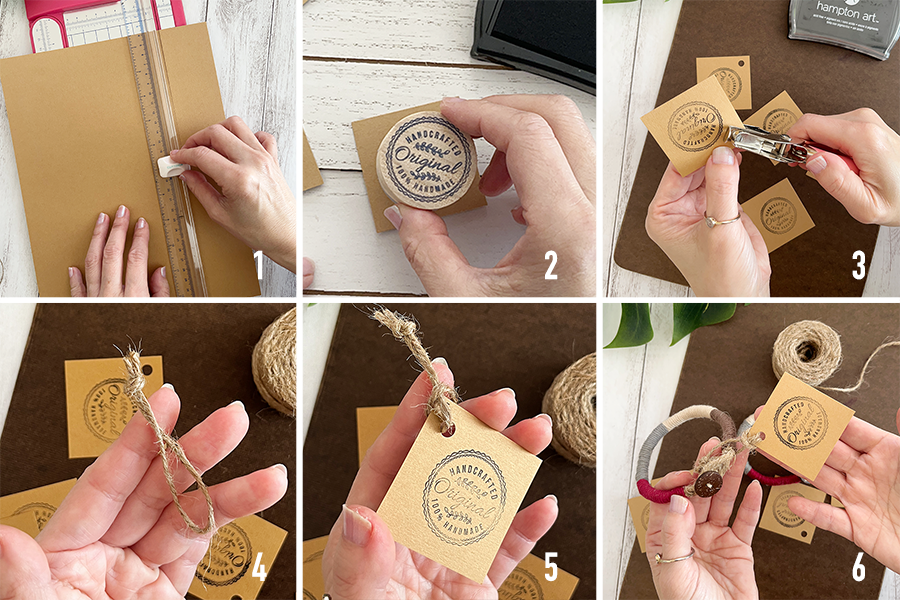 Instructions:
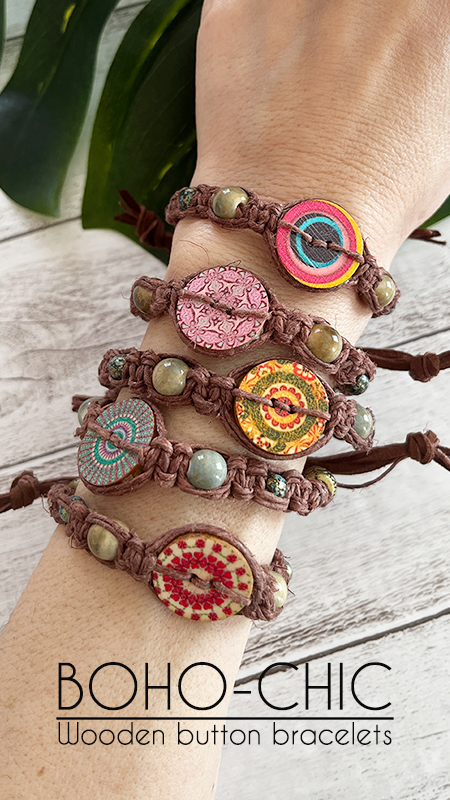
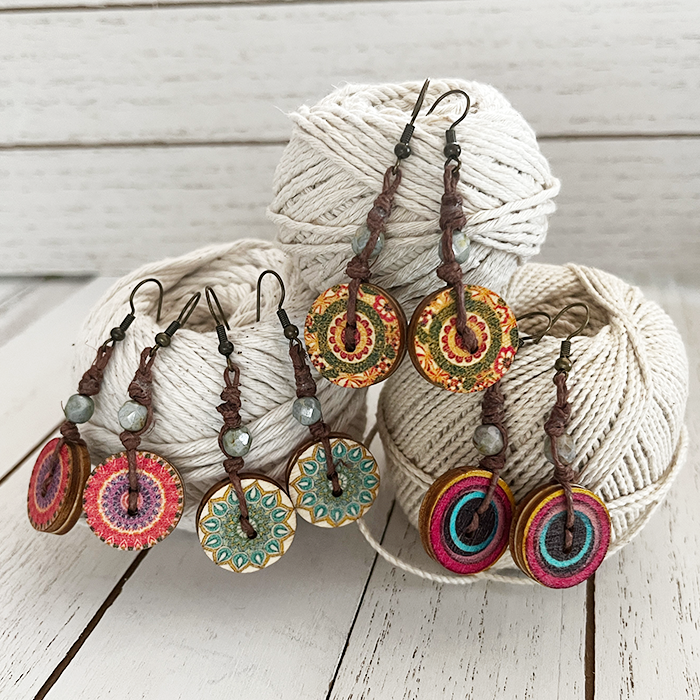
And there you have it! With just a few simple steps, you can create beautiful handmade tags for your DIY bracelets. Happy crafting! Please note that any crafts or DIY projects should be attempted with caution. As an Amazon Associate I earn from qualifying purchases. Please read my Amazon Associates Program for more info. Get ready to create your own stylish DIY boho-style wooden button bracelets! These colorful and beautiful handmade bracelet ideas are perfect for adding a touch of bohemian flair to any outfit. And if you want to take it a step further, check out another tutorial video on making matching wooden button earrings in the same boho style. Follow the link below to learn how to create these fun and vibrant accessories! "How to Make Wooden Button Earrings - Boho style colorful & fun earrings" https://youtu.be/paevyzMcz6I
Creating Boho Wooden Button Bracelets  Instructions:
Macrame Square Knot  Instructions:
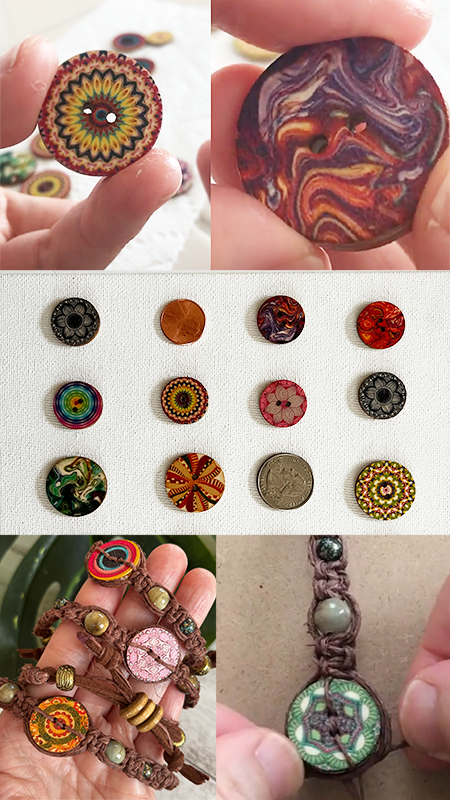
Repeat these steps, starting with step 2, to create as many square knots as desired. Creating reversible wooden buttons 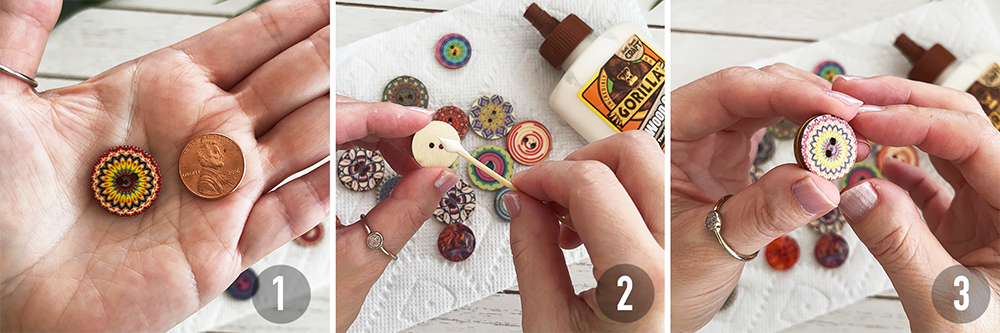
Tip 1 - Preventing hemp cord from fraying To prevent the hemp cord from fraying when threading through beads multiple times, apply a small amount of wood glue to the cord end. 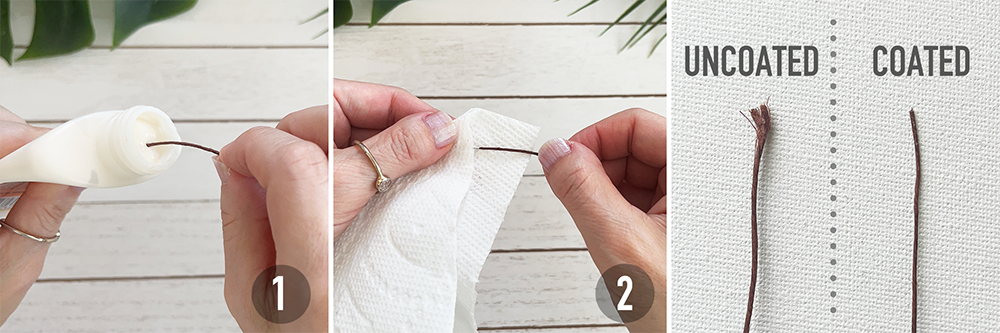
Tip 2 - Applying nail polish to wooden buttons To protect the surface and colors of wooden buttons, apply a clear nail polish. 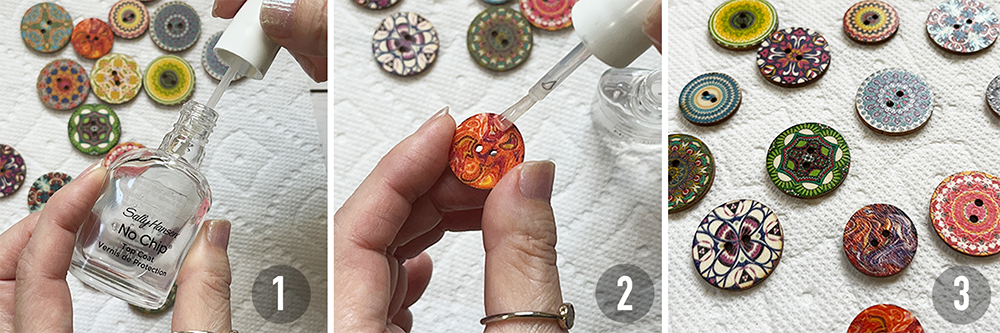
Please note that any crafts or DIY projects should be attempted with caution.
As an Amazon Associate I earn from qualifying purchases. Please read my Amazon Associates Program for more info. Looking for a fun and eco-friendly DIY project? Try making rustic and natural bracelets using plastic grocery bags! This is a great way to upcycle those bags and reduce waste. All you need are some basic tools and materials, like scissors, glue, and of course, the plastic bags. Simply cut, braid, and glue to create your own unique and stylish bracelets. With this simple yet creative project, you'll have a set of bracelets that are not only fashionable but also environmentally conscious. So why not give it a try? Enjoy making your own one-of-a-kind plastic bag bracelets!
 Creating the Braid Using Plastic Grocery Bags 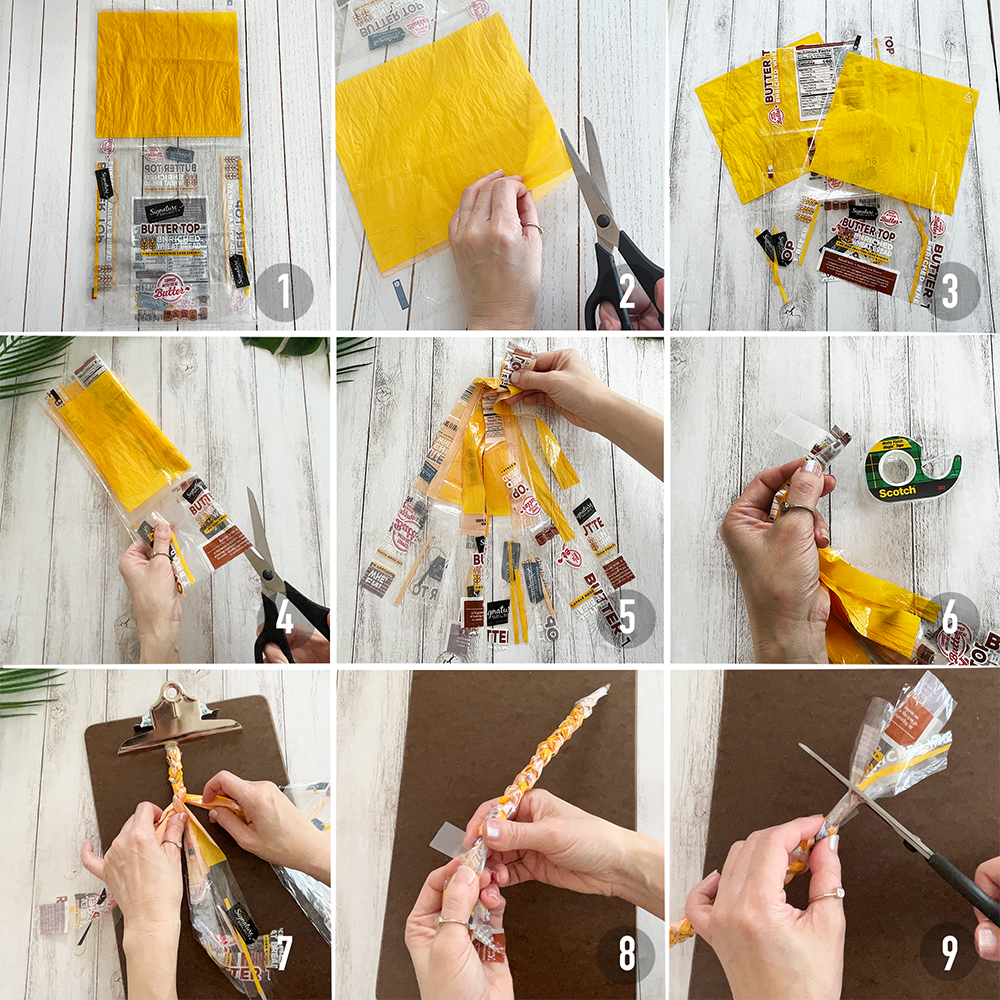 Instructions:
Creating the Bracelet 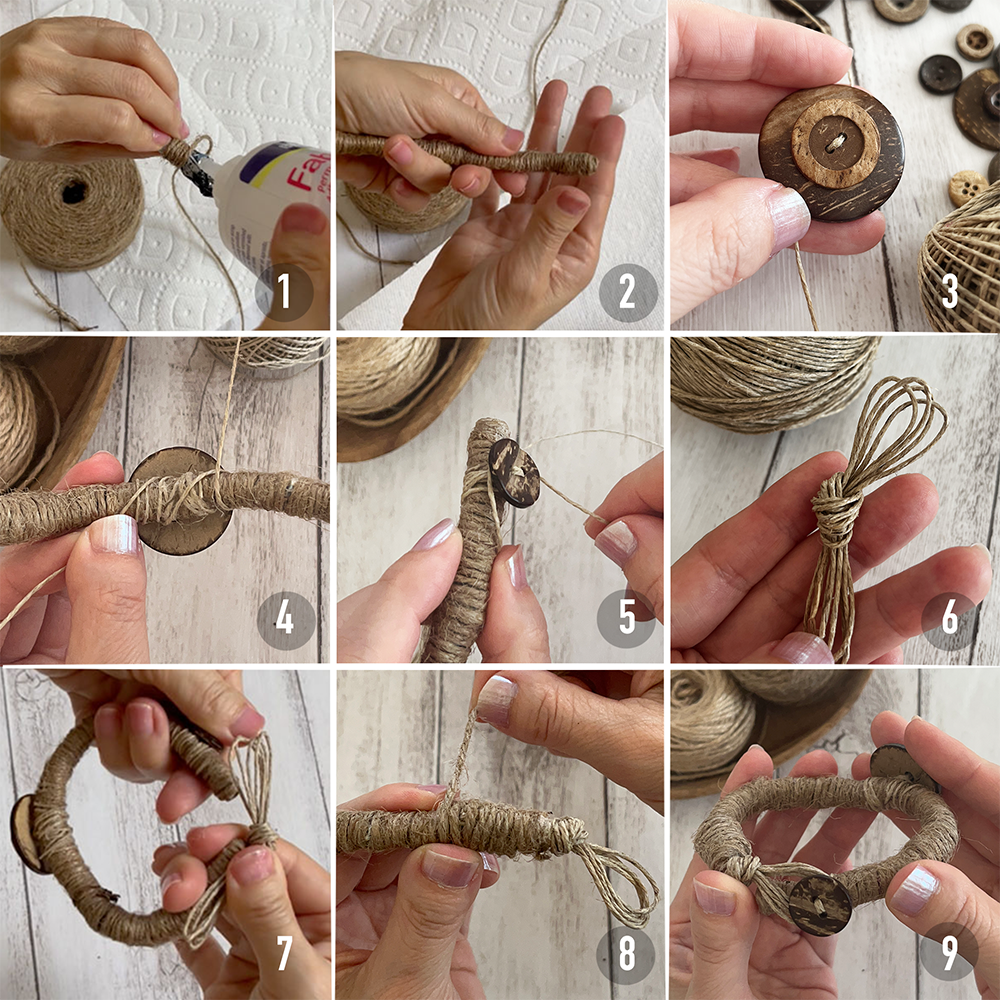 Instructions:
Please note that any crafts or DIY projects should be attempted with caution. Recycling Plastic Bags at Retail Stores
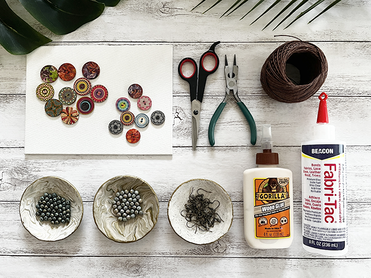
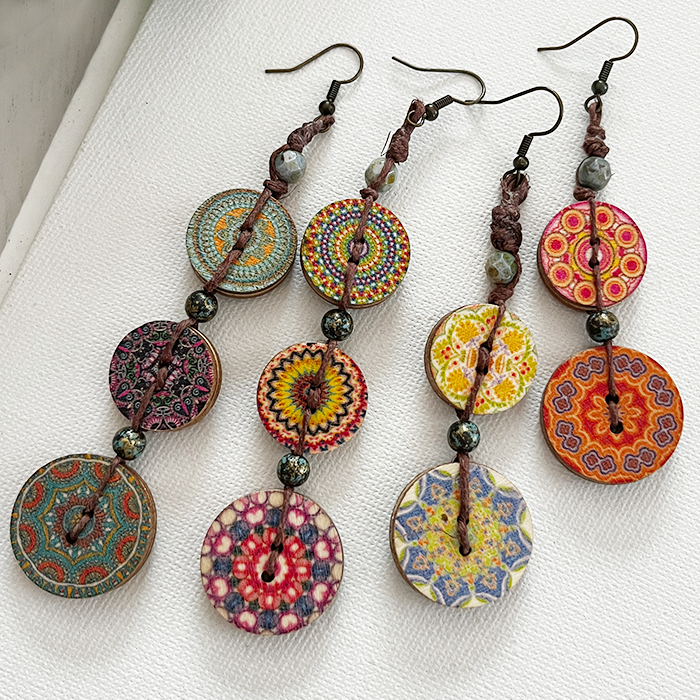
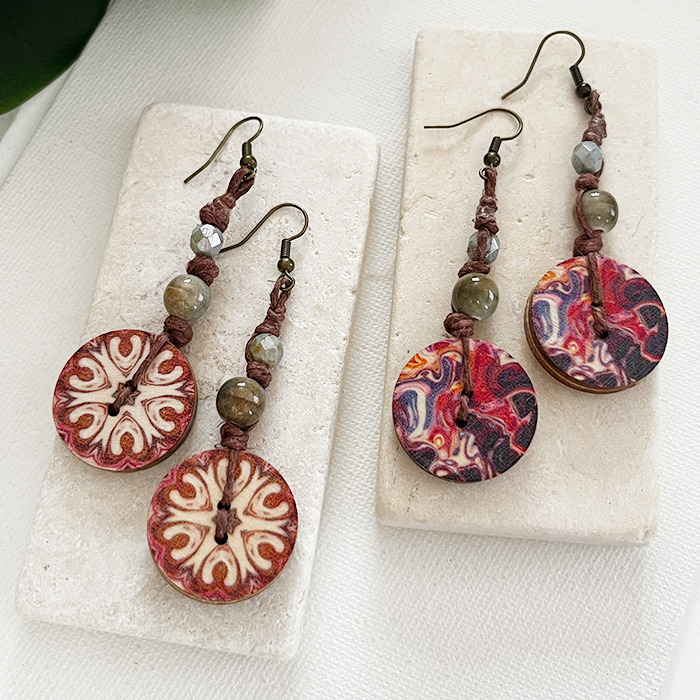
As an Amazon Associate I earn from qualifying purchases. Please read my Amazon Associates Program for more info. Create your own beautiful and colorful Boho-style wooden button earrings with this DIY tutorial video! These handmade earrings are not only fun and easy to make but also perfect for adding a touch of bohemian flair to your wardrobe. And for a complete set, check out a video tutorial on making matching bracelets. Follow the link below to learn how to create reversible macrame bracelets in the same Boho style. With this video, you'll be able to make unique and stunning accessories that are sure to impress. "How to Make Wooden Button Bracelets - Boho style colorful, fun and reversible macrame bracelets" https://youtu.be/RBHZLU4fXmM
Before you start, make sure to choose beads with LARGE HOLES that can easily accommodate natural polished hemp cord, ensuring they can thread through the cord securely for earrings. If the bead hole is not sufficiently large, you may want to consider using a 10LB HEMP CORD instead. Creating Reversible Wooden Buttons 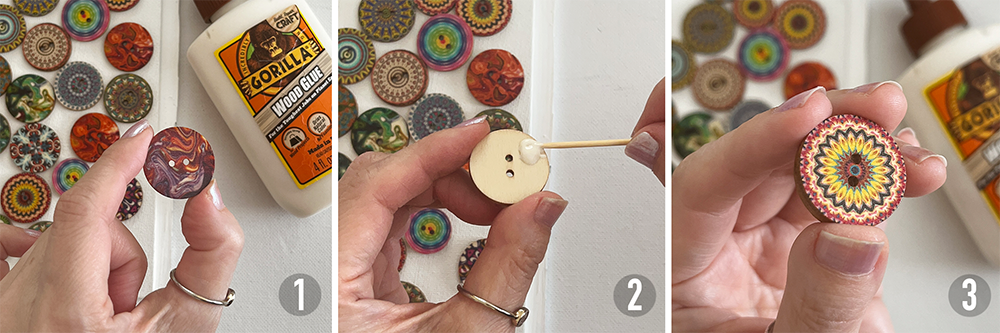
Creating Boho Wooden Button Earrings 
Please note that any crafts or DIY projects should be attempted with caution. Tip 1 - Applying nail polish to wooden buttons (Optional) To protect the surface and colors of wooden buttons, apply a clear nail polish. 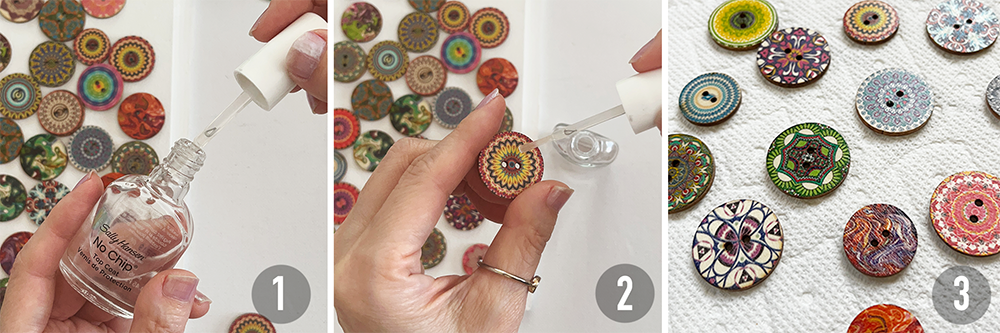
Tip 2 - Preventing hemp cord from fraying (Optional) When working with hemp cord, the ends of the cord can become frayed and difficult to thread through bead or button holes. To prevent this, try applying a small amount of wood glue to the end of the cord before threading it through the holes. The glue will create a protective barrier that keeps the cord from fraying and makes it easier to thread through the holes multiple times. By following this simple tip, you can save time and frustration when creating your boho-style wooden button earrings.
Mixing and Matching Colors and Patterns for Unique Earrings
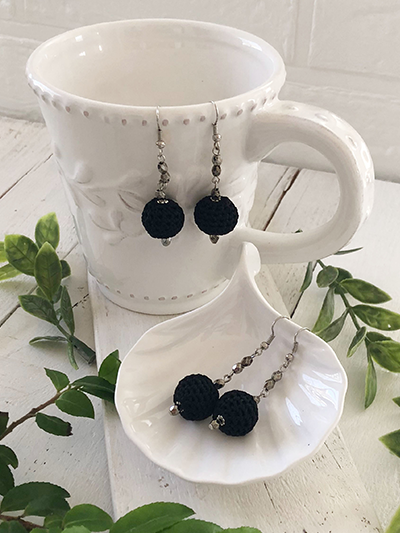
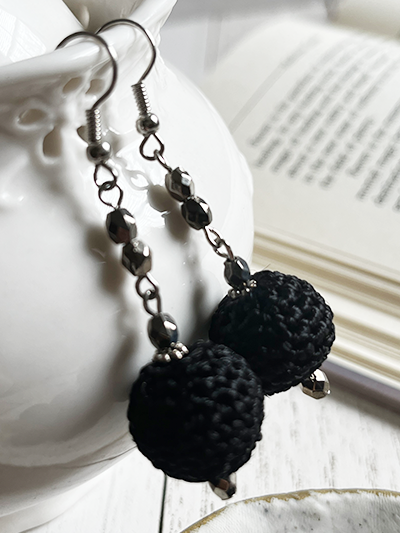
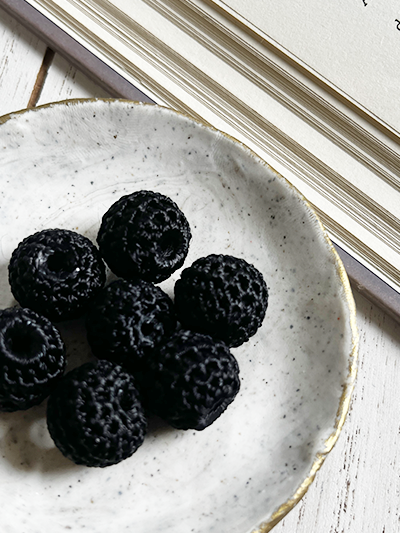
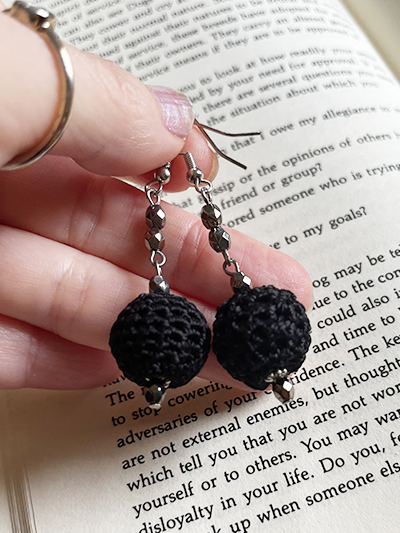
For this project, I used a selection of colorful and patterned wooden buttons to create a set of boho-style earrings. Using assorted buttons adds an extra fun element to the project as you get to mix and match different colors and patterns to create your own unique earrings. You can experiment with different button sizes, and designs to create a variety of earrings that suit your style. Are you looking for a fun and creative project? Why not try making your own large round bead statement earrings! These earrings are not only unique and stylish, but they also make a great gift for someone special. Plus, they can be dressed up or down to match any occasion, whether you're going for a casual look or dressing up for a party. To make these earrings, you can use a variety of materials, such as crocheted beads or cotton cord-wrapped large beads, which will give your earrings a natural and rustic feel. With a little bit of time and patience, you can create a pair of earrings that will be sure to turn heads. I hope you enjoy making them as much as I do!
Please note that any crafts or DIY projects should be attempted with caution.
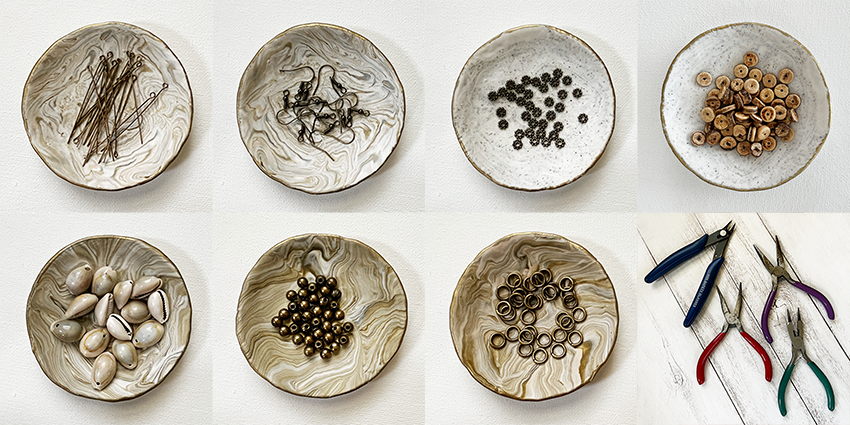
As an Amazon Associate I earn from qualifying purchases. Please read my Amazon Associates Program for more info. Get ready to create your very own DIY boho-style shell bracelet with an adjustable sliding closure! Cowrie shells are known to symbolize wealth and fertility, and were once used as a form of currency worldwide. With this project, you can create beautiful and meaningful bracelets to wear or give as gifts.
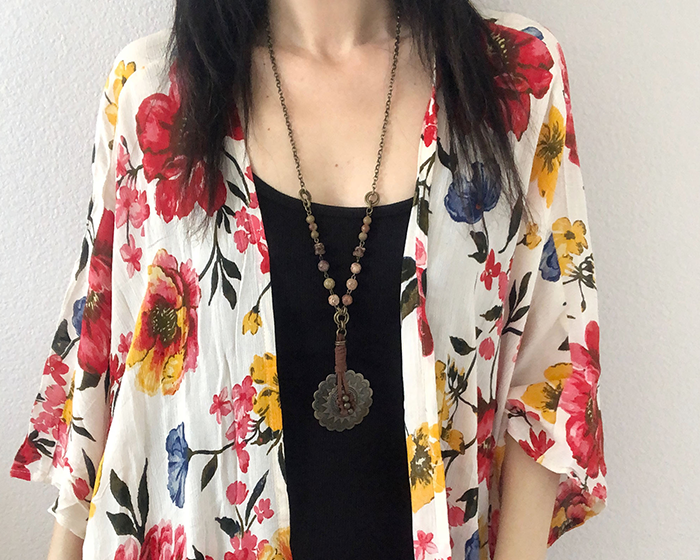
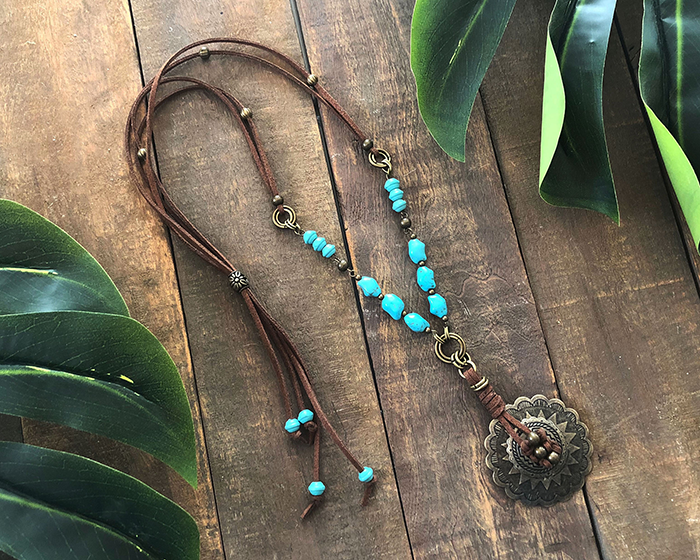
Are you a fan of boho-chic fashion? Why not create your own Concho-style pendant to add to your jewelry collection? This beautiful pendant can be attached to a metal chain or suede cord to create a stunning boho-vibe necklace that will complement any outfit. Both necklace cords work well with this Concho-style pendant, so you can choose the one that best suits your style. Whether you prefer a metal chain or suede cord, this pendant is the perfect addition to any boho-chic outfit. Get ready to show off your unique style and creativity with this beautiful piece of jewelry!
|
Author
Archives
November 2023
Categories |


 RSS Feed
